
Manual


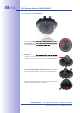
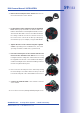
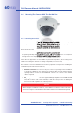
Table Of Contents
- Added Security Value
- Cost Benefits And Technical Advantages
- 2 INSTALLATION
- 3 OPERATING THE CAMERA
- 3.1 Manual And Automatic Operation - Overview
- 3.2 First Images And The Most Important Settings
- 3.3 Virtual PTZ
- 3.4 Correction Of Lens Distortion (L22 Only)
- 3.8 Additional Notes
- 3.8.1 Weatherproof Qualities
- 3.8.2 Password For The Administration Menu
- 3.8.3 Starting The Camera With The Factory IP Address
- 3.8.4 Reset The Camera To Factory Settings
- 3.8.5 Activate Event Control And Motion Detection
- 3.8.6 Deactivate Text And Logo Options
- 3.8.7 Deactivating The Daily Automatic Camera Reboot
- 3.8.8 Browser
- 3.8.9 Cleaning The Camera And Lens
- 3.8.10 Safety Warnings

www.mobotix.com • sales@mobotix.com
On-Wall Sets available in 0° and 10° inclinations allow the D24M to be installed quickly
On-Wall Sets available in 0° and 10° inclinations allow the D24M to be installed quickly
and easily on the wall or ceiling of a room. When using the set outdoors (IP65), ensure
and easily on the wall or ceiling of a room. When using the set outdoors (IP65), ensure
that the screw holes on the rear of the camera housing are sealed with the included foam
that the screw holes on the rear of the camera housing are sealed with the included foam
rubber washers. It is not possible to install the On-Wall Set directly above a surface- or
rubber washers. It is not possible to install the On-Wall Set directly above a surface- or
flush-mounted socket.
The 10° On-Wall Set is the right choice if you want to mount the D24M on a wall with the
The 10° On-Wall Set is the right choice if you want to mount the D24M on a wall with the
lens pointing vertically downward (90° or more). If the 10° On-Wall Set is not used, then
lens pointing vertically downward (90° or more). If the 10° On-Wall Set is not used, then
the angle of the lens may not exceed 80° for design-related reasons.
the angle of the lens may not exceed 80° for design-related reasons.
If the discreet appearance of the D24M is of particular importance, the In-Ceiling Set is
ideal for mounting the camera on ceilings or drywalls (see Section 2.6).
The network connection and drill holes must be prepared correctly before installing the
On-Wall Set (both indoors and outdoors):
•
: You can use any one of the four openings in the On-Wall Set
to guide the cabling into the camera. The network cable must be fed through the
opening without a connector. An additional connector to connect to the camera
cable is required.
•
: Use the supplied drilling template for the D24M On-Wall
Set (fold-out at the end of this manual) to mark the exact position for drilling the
anchor holes with regard to the camera position.
Caution
When using the On-Wall Set outdoors, ensure that the screw holes on the rear of the
camera housing are sealed with the foam rubber washers included in delivery (IP65).