
Manual


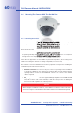
Table Of Contents
- Added Security Value
- Cost Benefits And Technical Advantages
- 2 INSTALLATION
- 3 OPERATING THE CAMERA
- 3.1 Manual And Automatic Operation - Overview
- 3.2 First Images And The Most Important Settings
- 3.3 Virtual PTZ
- 3.4 Correction Of Lens Distortion (L22 Only)
- 3.8 Additional Notes
- 3.8.1 Weatherproof Qualities
- 3.8.2 Password For The Administration Menu
- 3.8.3 Starting The Camera With The Factory IP Address
- 3.8.4 Reset The Camera To Factory Settings
- 3.8.5 Activate Event Control And Motion Detection
- 3.8.6 Deactivate Text And Logo Options
- 3.8.7 Deactivating The Daily Automatic Camera Reboot
- 3.8.8 Browser
- 3.8.9 Cleaning The Camera And Lens
- 3.8.10 Safety Warnings

www.mobotix.com • sales@mobotix.com
1. Install and prepare
2. : Please use the enclosed screws and screw anchors whenever
possible. It is essential that you use the supplied drilling template to ensure the
precise alignment of holes for either the mounting ring of the D24M IT/Secure or
the camera base of the D24M Basic (fold-out at the end of this manual).
3. for the cable and connector or insert the cable
behind the suspended ceiling or cable duct
4. Connect the pre-installed network cable of the camera to the installation cable
(adapter not included in delivery).
5. the camera to the ceiling or wall (see sections below).
6. lens (see Section 2.11)
Caution
For safety reasons, only use the pre-installed MOBOTIX network cable that was
included in the delivery. Always ensure that the rubber plug of the network cable
reliably protects the outer shell from moisture entering the camera. All openings of
the camera housing need to be properly sealed. This is the only way to guarantee
that the camera remains weatherproof.
Notes
The network cable is fed through the ceiling directly above the camera. Make sure
the cable is completely sealed by the rubber gasket on the housing (do not bend
the cable!) When preparing the installation, ensure that at least 15cm of cable
length (excluding the connector itself) remains inside the camera housing (similar
to factory preinstallation). This will ensure that you can turn and tilt the lens mount
freely later on.
If a surface-mounted socket is used, the camera must be mounted using the out-
door Wall Mount. The camera cannot be mounted directly on top of protruding,
surface-mounted sockets.