
Manual


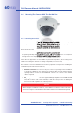
Table Of Contents
- Added Security Value
- Cost Benefits And Technical Advantages
- 2 INSTALLATION
- 3 OPERATING THE CAMERA
- 3.1 Manual And Automatic Operation - Overview
- 3.2 First Images And The Most Important Settings
- 3.3 Virtual PTZ
- 3.4 Correction Of Lens Distortion (L22 Only)
- 3.8 Additional Notes
- 3.8.1 Weatherproof Qualities
- 3.8.2 Password For The Administration Menu
- 3.8.3 Starting The Camera With The Factory IP Address
- 3.8.4 Reset The Camera To Factory Settings
- 3.8.5 Activate Event Control And Motion Detection
- 3.8.6 Deactivate Text And Logo Options
- 3.8.7 Deactivating The Daily Automatic Camera Reboot
- 3.8.8 Browser
- 3.8.9 Cleaning The Camera And Lens
- 3.8.10 Safety Warnings

www.mobotix.com • sales@mobotix.com
. In general, direct installation of the camera without any accessories is always
possible. However, to ensure a flush finish with the surface, you should first install a flush-
mounted wall outlet (space for the connection cable).
If you choose to mount the camera directly to a wall without the MOBOTIX-recommended
wall mount, you should position the camera in the center of the room to guarantee
maximum coverage.
. In general, direct installation of the camera without any accessories is always
possible. However, to ensure a flush finish with the surface, you should first install a flush-
mounted wall outlet (space for the connection cable).
If you choose to mount the camera directly to a wall without the MOBOTIX-recommended