
Manual


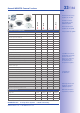

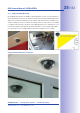
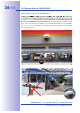

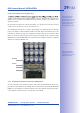

Table Of Contents
- Added Security Value
- Cost Benefits And Technical Advantages
- 2 INSTALLATION
- 3 OPERATING THE CAMERA
- 3.1 Manual And Automatic Operation - Overview
- 3.2 First Images And The Most Important Settings
- 3.3 Virtual PTZ
- 3.4 Correction Of Lens Distortion (L22 Only)
- 3.8 Additional Notes
- 3.8.1 Weatherproof Qualities
- 3.8.2 Password For The Administration Menu
- 3.8.3 Starting The Camera With The Factory IP Address
- 3.8.4 Reset The Camera To Factory Settings
- 3.8.5 Activate Event Control And Motion Detection
- 3.8.6 Deactivate Text And Logo Options
- 3.8.7 Deactivating The Daily Automatic Camera Reboot
- 3.8.8 Browser
- 3.8.9 Cleaning The Camera And Lens
- 3.8.10 Safety Warnings

www.mobotix.com • sales@mobotix.com
Outdoors, the D24M is usually mounted on a building wall. In principle, the camera can
be installed without additional wall mounts, although the positional range of the lens may
be limited as a result.
The cable exit of the D24M is located
in the center of the housing's underside. For more detailed information on the installation
process, see Sections 2.5 and above. The appropriate drilling templates can be found at
the end of the manual.
A HiRes MOBOTIX Camera Can Replace Up To 6 Conventional Cameras
One Camera For 4 Gas Pumps - Long-Term Recording Without Peripheral Devices