
Manual
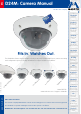
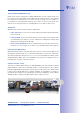
Table Of Contents
- Added Security Value
- Cost Benefits And Technical Advantages
- 2 INSTALLATION
- 3 OPERATING THE CAMERA
- 3.1 Manual And Automatic Operation - Overview
- 3.2 First Images And The Most Important Settings
- 3.3 Virtual PTZ
- 3.4 Correction Of Lens Distortion (L22 Only)
- 3.8 Additional Notes
- 3.8.1 Weatherproof Qualities
- 3.8.2 Password For The Administration Menu
- 3.8.3 Starting The Camera With The Factory IP Address
- 3.8.4 Reset The Camera To Factory Settings
- 3.8.5 Activate Event Control And Motion Detection
- 3.8.6 Deactivate Text And Logo Options
- 3.8.7 Deactivating The Daily Automatic Camera Reboot
- 3.8.8 Browser
- 3.8.9 Cleaning The Camera And Lens
- 3.8.10 Safety Warnings

www.mobotix.com • sales@mobotix.com
Contents
2.1.1 Ceiling And Wall Mounting 35
2.1.2 Mounting Options For IT/Secure Models 37
2.1.3 Network Connection And Power Supply, UPS 38
2.1.4 Preparing The Camera Connections, Wall Outlets 39
2.1.5 Wiring, Fire Prevention, Lightning And Surge Protection 40
2.2.1 Delivered Parts And Camera Components Of D24M IT/Secure 42
2.2.2 D24M IT/Secure Camera Housing And Connectors 43
2.2.3 Dimensions Of D24M IT/Secure 44
2.2.4 Drilling Template For The D24M IT/Secure Mounting Ring 45
2.3.1 Delivered Parts And Camera Components Of D24M Basic 46
2.3.2 D24M Basic Camera Housing And Connector 47
2.3.3 Dimensions Of D24M Basic 48
2.3.4 Drilling Template For The D24M Basic 49
2.5.1 Mounting Instructions 54