
Manual
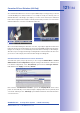


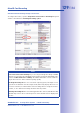
Table Of Contents
- Added Security Value
- Cost Benefits And Technical Advantages
- 2 INSTALLATION
- 3 OPERATING THE CAMERA
- 3.1 Manual And Automatic Operation - Overview
- 3.2 First Images And The Most Important Settings
- 3.3 Virtual PTZ
- 3.4 Correction Of Lens Distortion (L22 Only)
- 3.8 Additional Notes
- 3.8.1 Weatherproof Qualities
- 3.8.2 Password For The Administration Menu
- 3.8.3 Starting The Camera With The Factory IP Address
- 3.8.4 Reset The Camera To Factory Settings
- 3.8.5 Activate Event Control And Motion Detection
- 3.8.6 Deactivate Text And Logo Options
- 3.8.7 Deactivating The Daily Automatic Camera Reboot
- 3.8.8 Browser
- 3.8.9 Cleaning The Camera And Lens
- 3.8.10 Safety Warnings

www.mobotix.com • sales@mobotix.com
The following options facilitate access to the stored image and video sequences on a
MicroSD card:
• Play back the recorded event images without audio directly
from the MicroSD card using the Playback view of the camera software.
• Play back the recorded video sequences with audio by accessing the
MicroSD card in the MOBOTIX camera via the camera.
•
In MxControlCenter: Play back the recorded video sequences with audio by access-
ing the MicroSD card in the MOBOTIX camera via the camera or with a direct access
to the MicroSD card via a card reader connected to the computer. Access the card
by setting the MicroSD card's drive/volume as a "directory" in MxControlCenter.
If the MicroSD card's contents are encrypted, you need to enter the corresponding pass-
word before you can access the recorded video data. A dialog will automatically appear
in MxControlCenter or MxEasy.
Caution
When using the MicroSD card from one MOBOTIX camera in another MOBOTIX
camera, you need to make sure that the time on the original camera is in sync with
the new camera. It is recommended to use automatic time synchronization via a
time server (Admin Menu > Date and Time).
Follow these steps to deactivate the memory on a MicroSD card (
):
1. Activate the None option.
2. Click on button at the bottom of the dialog and then Close.
3. Reboot the camera (Admin Menu> Reboot Camera).
4. Once the camera has rebooted, make sure that the symbol
FR REC is no longer
visible in the bottom right-hand corner of the live image.
5. You can now safely remove the MicroSD card from the camera (see Section 2.12).