
Manual


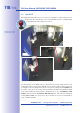

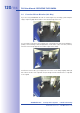
Table Of Contents
- Added Security Value
- Cost Benefits And Technical Advantages
- 2 INSTALLATION
- 3 OPERATING THE CAMERA
- 3.1 Manual And Automatic Operation - Overview
- 3.2 First Images And The Most Important Settings
- 3.3 Virtual PTZ
- 3.4 Correction Of Lens Distortion (L22 Only)
- 3.8 Additional Notes
- 3.8.1 Weatherproof Qualities
- 3.8.2 Password For The Administration Menu
- 3.8.3 Starting The Camera With The Factory IP Address
- 3.8.4 Reset The Camera To Factory Settings
- 3.8.5 Activate Event Control And Motion Detection
- 3.8.6 Deactivate Text And Logo Options
- 3.8.7 Deactivating The Daily Automatic Camera Reboot
- 3.8.8 Browser
- 3.8.9 Cleaning The Camera And Lens
- 3.8.10 Safety Warnings

www.mobotix.com • sales@mobotix.com
Under certain circumstances, you may have to reset the camera to its factory IP address.
This could be the case, for example, if the IP address has been lost or the camera does
not respond to the last known IP address.
1. If the camera is running, disconnect the camera's power supply.
2. Reconnect the power supply of the camera.
3. Wait until both LEDs light up simultaneously for the first time.
4. Press the camera's within four seconds.
5. After about two more seconds, the camera is accessible via its factory IP address
(see label on the camera housing).
Note
If you use the camera's to load the factory network configuration, this configura-
tion is not automatically saved in the camera's Flash memory. When the camera is
next rebooted without using , the last stored network configuration will be used.
To permanently store the new network configuration in the camera's Flash memory,
open .
Caution
As opposed to resetting the camera using
, the user information will not be reset if the camera is booted using
the factory IP address.