
Manual


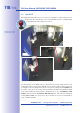

Table Of Contents
- Added Security Value
- Cost Benefits And Technical Advantages
- 2 INSTALLATION
- 3 OPERATING THE CAMERA
- 3.1 Manual And Automatic Operation - Overview
- 3.2 First Images And The Most Important Settings
- 3.3 Virtual PTZ
- 3.4 Correction Of Lens Distortion (L22 Only)
- 3.8 Additional Notes
- 3.8.1 Weatherproof Qualities
- 3.8.2 Password For The Administration Menu
- 3.8.3 Starting The Camera With The Factory IP Address
- 3.8.4 Reset The Camera To Factory Settings
- 3.8.5 Activate Event Control And Motion Detection
- 3.8.6 Deactivate Text And Logo Options
- 3.8.7 Deactivating The Daily Automatic Camera Reboot
- 3.8.8 Browser
- 3.8.9 Cleaning The Camera And Lens
- 3.8.10 Safety Warnings

www.mobotix.com • sales@mobotix.com
Clicking
OK
prompts MxEasy to use the selected cameras and to generate a screen with
the live images of the four cameras that you selected first.
The panel at the bottom right-hand corner always displays the most recent event image
of whatever camera is visible in the large panel. Double-click on a small camera panel to
move this camera's live image to the large panel. Click the
Add cameras
button at any
time to add MOBOTIX cameras to MxEasy (max. 16 cameras in total).
"Add cameras" button
(marked red)
Last event image
(marked red)