
Manual


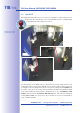

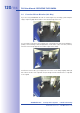
Table Of Contents
- Added Security Value
- Cost Benefits And Technical Advantages
- 2 INSTALLATION
- 3 OPERATING THE CAMERA
- 3.1 Manual And Automatic Operation - Overview
- 3.2 First Images And The Most Important Settings
- 3.3 Virtual PTZ
- 3.4 Correction Of Lens Distortion (L22 Only)
- 3.8 Additional Notes
- 3.8.1 Weatherproof Qualities
- 3.8.2 Password For The Administration Menu
- 3.8.3 Starting The Camera With The Factory IP Address
- 3.8.4 Reset The Camera To Factory Settings
- 3.8.5 Activate Event Control And Motion Detection
- 3.8.6 Deactivate Text And Logo Options
- 3.8.7 Deactivating The Daily Automatic Camera Reboot
- 3.8.8 Browser
- 3.8.9 Cleaning The Camera And Lens
- 3.8.10 Safety Warnings

www.mobotix.com • sales@mobotix.com
If you have assigned a
fixed IP address
to your computer, you will probably
want to assign fixed IP addresses
(issued by your system administra-
tor) to every camera (the
option). Here, for the
most part, you should either enter
a similar configuration as in the
network settings of your computer.
Once you click OK, the selected
cameras will be reconfigured
automatically. All reconfigured
cameras will then be running in
the same subnet as the computer
and are displayed as Accessible
in the camera list.
You can highlight the cameras that
you would like to display and manage
in MxEasy. If you select a camera
with the status OK, MxEasy auto-
matically displays the live images
from that camera in the preview
window. If you are using [Ctrl]-click
to select additional cameras, the
image from the camera selected
last is shown in the preview window.
Use the shortcut menu commands
(right-click) to add MOBOTIX cam-
eras to or remove them from the
list. In addition, you can display
further information of a camera and
change the user name/password
of a camera. For more information
on this topic, see the MxEasy User
Manual.