
Manual


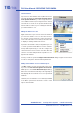
Table Of Contents
- Added Security Value
- Cost Benefits And Technical Advantages
- 2 INSTALLATION
- 3 OPERATING THE CAMERA
- 3.1 Manual And Automatic Operation - Overview
- 3.2 First Images And The Most Important Settings
- 3.3 Virtual PTZ
- 3.4 Correction Of Lens Distortion (L22 Only)
- 3.8 Additional Notes
- 3.8.1 Weatherproof Qualities
- 3.8.2 Password For The Administration Menu
- 3.8.3 Starting The Camera With The Factory IP Address
- 3.8.4 Reset The Camera To Factory Settings
- 3.8.5 Activate Event Control And Motion Detection
- 3.8.6 Deactivate Text And Logo Options
- 3.8.7 Deactivating The Daily Automatic Camera Reboot
- 3.8.8 Browser
- 3.8.9 Cleaning The Camera And Lens
- 3.8.10 Safety Warnings

www.mobotix.com • sales@mobotix.com
The symbols in the first column and the legend in the dialog indicate whether you can
access a particular camera directly from the MxControlCenter, which is the case for all
cameras designated with
(
OK
) . Cameras designated with
(
dierent subnet
) are
located in a dierent subnet. This usually applies to new cameras or cameras that have
been reset to their factory settings.
Note
The MxControlCenter finds all MOBOTIX cameras, even when the computer and the
cameras are not located in the same subnet.
Select the cameras that you would like to display in a Layout (a view with cameras) and
click
Add selected video sources
.
The
dialog will appear. You can choose to either create a new layout
with the cameras that have been found or simply add those cameras to the MxControlCenter.
If some of the selected cameras are in dierent subnets, MxControlCenter displays the
following dialog:
Click
to reconfigure the cameras for your specific network area.