
Manual


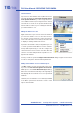
Table Of Contents
- Added Security Value
- Cost Benefits And Technical Advantages
- 2 INSTALLATION
- 3 OPERATING THE CAMERA
- 3.1 Manual And Automatic Operation - Overview
- 3.2 First Images And The Most Important Settings
- 3.3 Virtual PTZ
- 3.4 Correction Of Lens Distortion (L22 Only)
- 3.8 Additional Notes
- 3.8.1 Weatherproof Qualities
- 3.8.2 Password For The Administration Menu
- 3.8.3 Starting The Camera With The Factory IP Address
- 3.8.4 Reset The Camera To Factory Settings
- 3.8.5 Activate Event Control And Motion Detection
- 3.8.6 Deactivate Text And Logo Options
- 3.8.7 Deactivating The Daily Automatic Camera Reboot
- 3.8.8 Browser
- 3.8.9 Cleaning The Camera And Lens
- 3.8.10 Safety Warnings

www.mobotix.com • sales@mobotix.com
Launch MxControlCenter after successful installation (see section
Installation
) by double-
clicking the shortcut that was created by the Installer or the executable
MxCC.exe file in
the installation directory on your computer.
When MxControlCenter is launched for the first time, the
dialog opens and the application automatically searches for MOBOTIX cameras
in the local network.To perform a camera search at a later time, select
Add
from the menu.
If your MOBOTIX camera is properly connected, it should appear together with the exist-
ing video sources in the following list:
Note
Video sources
in this context not only refer to MOBOTIX cameras, but also to third-
party IP cameras, file server paths, MxPEG clips and analog cameras connected via
MxServer (e.g. analog dome cameras). These video sources are not found automati-
cally and need to be added manually.
Video sources
Automatic search for
MOBOTIX cameras!