
Manual

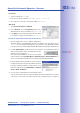

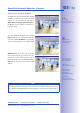


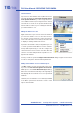
Table Of Contents
- Added Security Value
- Cost Benefits And Technical Advantages
- 2 INSTALLATION
- 3 OPERATING THE CAMERA
- 3.1 Manual And Automatic Operation - Overview
- 3.2 First Images And The Most Important Settings
- 3.3 Virtual PTZ
- 3.4 Correction Of Lens Distortion (L22 Only)
- 3.8 Additional Notes
- 3.8.1 Weatherproof Qualities
- 3.8.2 Password For The Administration Menu
- 3.8.3 Starting The Camera With The Factory IP Address
- 3.8.4 Reset The Camera To Factory Settings
- 3.8.5 Activate Event Control And Motion Detection
- 3.8.6 Deactivate Text And Logo Options
- 3.8.7 Deactivating The Daily Automatic Camera Reboot
- 3.8.8 Browser
- 3.8.9 Cleaning The Camera And Lens
- 3.8.10 Safety Warnings

www.mobotix.com • sales@mobotix.com
Once the camera has been connected to the network, you need to set up the camera's
network interface accordingly. This step involves setting up and checking the network
parameters of the camera. If your network is already using an IP address in the
10.x.x.x
range with a
255.0.0.0
network mask, you do not need to change the camera's network
parameters. You can access the camera directly (see Section 3.2.2). If your network or
computer does not use an IP address in the 10.x.x.x range (e.g. in the 192 or 172 ranges), you
should follow one of the following methods for changing the camera's network parameters:
• (Section 3.2.1)
• (Sections 3.2.3 and 3.2.4)
Notes
For the following examples, we will use a camera with the factory address
10.8.0.99
.
Replace this IP address with the IP address of your camera. You will find the IP
address of your camera on a small sticker on the camera. Make sure that the IP
addresses used in the following examples are not already being used by other
devices in the network.
Hint: Pressing the on the camera (see Section 2.2.2) prompts the camera to
announce its current IP address over a speaker.
In order to manually set up the network parameters of the MOBOTIX camera, you need a
computer that is using a 10.x.x.x IP address. The computer's network parameters usually
have to be changed for this purpose.
1. Open
Connections
. Clicking opens the dialog
shown.
2.
Double-click ). On the General
tab, activate the
Use the following IP address
option.
Enter an IP address in the 10.x.x.x range in this field
(e.g.
10.8.0.11).
3. Once all dialogs have been closed , the computer
will have the IP address
10.8.0.11.
Caution:
Netmask 255.0.0.0