
User manual


3.5 Starting the Camera With an Automatic IP Address (DHCP)
If your network has a DHCP server, you can start the camera with DHCP support. In
this case, the DHCP server automatically assigns an IP address.
As soon as startup has been completed, the camera automatically announces its
IP address, its network mask and its MAC address. Please note that this feature
needs to be activated for this to work. Note that this announcement function can be
deactivated (Admin Menu> Loudspeaker and Microphone).
Proceed as follows to start the camera using DHCP:
• If the camera is powered on, disconnect the power supply of the camera by
unplugging the corresponding cable.
• Reconnect power to the camera and observe the LEDs.
• Wait until all six LEDs are lighting up simultaneously.
• After the LEDs have lit up, press the "R" key for about one second.
• LED5 briefly blinks to acknowledge the command and the
camera plays a sound ("Boing, Boing").
• After about another 10 seconds, the camera will announce the
network parameters.
You can now access the camera using the IP address it just announced.
© MOBOTIX AG • Security-Vision-Systems • Made in Germany
www.mobotix.com • sales@mobotix.com
78/92
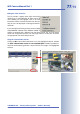
M12 Camera Manual Part 1
Activate the camera
speaker!
Announce IP address:
Press "R" key
In case of an error, the
camera uses its last IP
address
Press "R" key
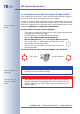
Note
Simply press the "R" key once if you would like to prompt a running
camera to announce its network settings.
Caution
When starting the camera with DHCP support, make sure that the net-
work has a properly functioning DHCP server. If this is not the case, the
camera cannot obtain a valid IP address and will fall back to its last
known IP address.
until this LED blinks