
User manual

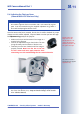

• Remove any installed connection cables and
guide the connection cables through the foot
of the mount and the turn/tilt unit of the
SecureFlex mount. Hook up the cables to the
camera connectors, as described in section
2.12,
Preparing the Installation
.
• Re-install the turn/tilt unit and the bottom
cover of the SecureFlex mount and lightly
tighten all screws of the turn/tilt unit so you
can easily find the best camera position later
on.
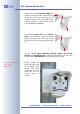
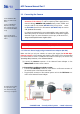
• Use the supplied screws M6x25mm (item13), washers dia. 6.4mm
(item12) and nuts M6 (item14) to attach the pole mount to the pole, then
press the white caps (item10) onto the hex heads of the screws.
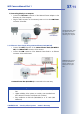
• Properly position the
camera and then tigh-
ten all screws of the
turn/tilt unit (max.
4 Nm/2.95 lbf ft) to
make sure that the
camera keeps its
position.
© MOBOTIX AG • Security-Vision-Systems • Made in Germany
www.mobotix.com • sales@mobotix.com
50/92
M12 Camera Manual Part 1
Max. torque for all Allen
screws: 4Nm
(2.95lbf ft)