
User manual
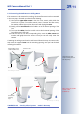


2.11.3 Converting the Wall Mount to Ceiling Mount
If the camera is to be mounted to a ceiling, the SecureFlex mount can be converted
in four easy steps. Proceed as outlined in the following:
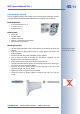
(1) Unscrew the upper Allen screw in the foot of the mount, which holds the
turn/tilt unit in place (5mm Allen wrench, item3). Remove the Allen screw,
the washer and the hex nut from the mount and unplug the cover.
(2) Gently pull the turn/tilt unit and all cables out of the vertical opening of the
foot.
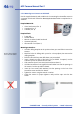
(3) First insert the cables, then the turn/tilt unit into the horizontal opening of the
foot (all the way to the stop).
(4) Place the hex nut into the corresponding hole, insert the Allen screw with
washer and lightly fasten the screw so that you can still easily move the
camera.
Converting the ceiling mount back to wall mount follows the steps in reverse order.
Only insert the supplied cover into the remaining opening once you have finished
mounting the camera.
© MOBOTIX AG • Security-Vision-Systems • Made in Germany
www.mobotix.com • sales@mobotix.com
39/92
M12 Camera Manual Part 1
Converting from wall
mount to ceiling mount in
four easy steps
Max. torque for all Allen
screws: 4Nm
(2.95lbf ft)
Mount
Pull out!
Push in until
reaching
stop!
1
2
3
4
Remove cover
Cover
Mounting to a wall
Mounting to a ceiling
Remove Allen screw,
washer and hex nut