Tripy RoadMaster User's Manual User's Manual Rev 1.10.2 - 2007/07/19 RoadMaster GPS based road books Reader/Recorder ©Tripy MAN0004-RevB_EN-RoadMaster_Manual_1.10.x – Rev 1.10.2 - .
Tripy RoadMaster User's Manual 1 Table of contents 1 Table of contents................................................................................................................2 2 New functions of the Version 1.10.2 firmware..................................................................5 3 Definitions...........................................................................................................................7 3.1 Beacon..................................................................
Tripy RoadMaster User's Manual 9 Main menu ........................................................................................................................32 10 Configuring your RoadMaster........................................................................................33 10.1 Contrast....................................................................................................................33 10.2 Time zone...............................................................................
Tripy RoadMaster User's Manual 17 Heading for......................................................................................................................64 17.1 Heading for gas stations or any other POI.................................................................64 17.2 Heading for a town....................................................................................................64 17.3 Heading towards a GPS position.......................................................................
Tripy RoadMaster User's Manual 2 New functions of the Version 1.10.2 firmware The current version 1.10.2 of the RoadMaster manual applies to the firmware version 1.10.x; Prior editions of the firmware do not offer the same functionalities. If the firmware of your RoadMaster is not the latest, update it without delay following the instructions of §18 Updates. Comparing to the previous revision of the manual (1.8.
Tripy RoadMaster User's Manual Usage and Sharing of files: Extension of the RoadMaster connectivity to an external USB mass memory. See § 12 PC connection. Recording of waypoint or POI through a long pressure of the « » button. By this way, a WP or POI (depending on the fact that you are in recording mode or not) may be recorded at any time, irrespective of the screen currently displayed. See § 15.1.2 Logging Waypoint while recording or § 15.1.4 Recording of a POI.
Tripy RoadMaster User's Manual 3 Definitions 3.1 Beacon Equivalent of the waypoint in a compass mode itinerary (without routing nor « dot-arrow » symbolism). In this instance, the beacons only carry the information of position as well as direction and distance to the next beacon. Beacons and waypoints may be mixed in an itinerary containing both routed and non-routed sections. 3.
Tripy RoadMaster User's Manual 3.9 Track A track is a succession of coordinates representing the itinerary that the system has recorded and should reproduce. When you read an electronic road book, you actually play the track back. The track is used to verify that you do not move away from the initial path. When you create a road book by actually recording it on site, you are allowed to generate the waypoints or beacons at all directions changes. 3.
Tripy RoadMaster User's Manual 4 Description des produits Tripy 4.1 Concept Tripy is a unique concept fulfilling three complementary motivations : CREATE or AQUIRE - the freedom to elaborate your own road books APPRECIATE or EXPERIMENT - riding original roads in a pleasant and safe way SHARE - itineraries and other information within a community of users. To meet these motivations, TRIPY s.a.
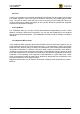
Tripy RoadMaster User's Manual 4.1.1 Various possibilities to elaborate an itinerary : See diagram A in parallel with this description. 1) Creating your own itineraries by means of the Road Tracer Pro software 2) Downloading existing road books from the website www.tripy.eu or any other site offering itineraries under the Tripy format (file extension « .trb ») 3) Using the Tele-Atlas™ maps for on-road routing. 4) Using topographic maps for OFF-road tracing.
Tripy RoadMaster User's Manual 1) Own itineraries (See RoadTracer Pro manual) 11) Exchanges (see §12.2.3) 5) .GPX 6) .TXT (See RoadTracer Pro manual) A. Elaboration of an itinerary Sophisticated road book Recording of : - Track (elementary road book) - POI road book beacons from RoadMaster 2) Downloading of road books (See §12.2) 8) Recording of beacons (OFF Road or ON Road) (See §15.1.2) 9) Recording of POI’s (See §15.1.4) 10) Recording of a succession of GPS positions or towns (See §17.
Tripy RoadMaster User's Manual 4.1.2 Various means to ride an itinerary: 4.1.2.1 Dot-arrows road book : Read the following comments in parallel with diagram B. A) Reach the starting point of a road book or POI in compass mode (POI = town, gas stations, own POI) B) Follow a road book in dot-arrows mode C) Follow a road book in compass mode D) Follow a road book in the special 4x4 compas mode E) Display itinerary data: time, speed, a.s.
Tripy RoadMaster User's Manual B. Ride an itinerary (dot-arrows road book) A) Reach the starting point of a road book or POI in compass mode ◄► B) Follow a road book in dot-arrows mode C) Follow a road book in compass mode G) Display towns further down the itinerary E+F) Display itinerary and totaliser data D) Follow a road book in the special 4x4 compas mode ©Tripy MAN0004-RevB_EN-RoadMaster_Manual_1.10.x – Rev 1.10.2 - .
Tripy RoadMaster User's Manual C. Ride an itinerary (compass mode) ◄► A) Follow a beacon road book D) Display towns further down the itinerary E) Display simplified dotarrows with track angles at each beacon B+C) Display itinerary and totaliser data ©Tripy MAN0004-RevB_EN-RoadMaster_Manual_1.10.x – Rev 1.10.2 - .
Tripy RoadMaster User's Manual 4.2 RoadMaster main functions 4 main functions road books Reader (displays existing road book files in dot-arrows or compass modes) Tracks Recorder (records your own itineraries) Tripmaster and dashboard (summarising position, distances and time informations) Beacon Navigator towards programmed points of interest (towns, closest gas stations, your home, your work place, …) Speed traps Warning 4.
Tripy RoadMaster User's Manual 4.4 Road Master identification and marking Your RoadMaster is equipped with an identification sticker on its back. This sticker is in synthetic material and waterproof. It carries the product references as well as its serial number. Copy of this sticker is shown on the packaging. It is important to keep this sticker intact to retain the product warranty rights.
Tripy RoadMaster User's Manual 4.5 Liste of item codes, accessories, prices See websites www.tripy.xx (xx= eu, fr, be, lu, nl, de, co.uk) to know the latest item codes and prices. 4.6 Optional lighting ref 6106 The Tripy RoadMaster external lighting (ref. 6106) is an assembly of a connector, a vertical holder a light emitting diode (LED) and a reflector.
Tripy RoadMaster User's Manual 4.7 Optional hardened craddle ref 6109 The shockproof craddle si aimed at receiving the RoadMaster. This cradle is designed to withstand the harshest requirements in terms of shocks, vibrations as encountered under intensive use or rally, a.s.o. It offers a row of lights operating similarly to the standard lighting described above. I is supplied with a power cord to the vehicle mains. This cable holds a waterproof connector. ©Tripy MAN0004-RevB_EN-RoadMaster_Manual_1.10.
Tripy RoadMaster User's Manual 5 Tripy Documentation The Tripy documentation includes the following: Level Title • 1 Quick Start Manual (hardware & software) User’s Manual (RoadMaster hardware) 2 3 4 • This document available on paper or electronically in *.
Tripy RoadMaster User's Manual 6 Starting up 6.1 Battery loading Before any use, it is recommended to conduct a full loading. To do so, connect the loader for at least one night (20 hours preferably). Your RoadMaster will remain ON for the whole duration of the loading (it is not possible to switch it OFF). The loading ends automatically after 20 hours whatever was the load level prior to starting the loading.
Tripy RoadMaster User's Manual 6.3 RoadMaster knobs functions Page knob SHORT = access to sub-menus & LONG = return to main menu 2 1 ON/OFF knob External lighting operation Reset 3 4 Knob « » or OK 5 Short pressure = ENTER ; - Menu selection - Carrousel (roadbook navigation) Arrows knobs to navigate through the screens and step back & forth through the waypoints Long pressure = - Waypoint or POI logging 1 = ON/OFF knob Main function: setting the device ON/OFF.
Tripy RoadMaster User's Manual 6.4 ON / OFF Press briefly the red ON/OFF knob (1). RoadMaster displays a disclaimer message. You may accelerate the transition by pressing the « » knob (5). RoadMaster displays then the satellite searching screen (see following chapters). If you are located inside a building or, for any other reason wish to skip this screen, press the « » knob (5) once more. You have then access to the various menus explained throughout this manual.
Tripy RoadMaster User's Manual PC access. When the battery will be reloaded, the recording will not resume, but the record will not be lost. If one wishes to continue the recording, one shoud start the recording once again after battery re-loading . If RoadMaster is busy guiding, one will have to re-select the road book or POI to resume the guiding. 6.7 General Reset The General Reset operation should only be used in an hypothetical device malfunction situation (e.g.
Tripy RoadMaster User's Manual 7 Mounting RoadMaster on your bike RoadMaster is fitted on the back with two M4 inserts showing a maximum thread of 6 mm (0,234 inch). These inserts are placed 48,6mm (1,912 inches) apart, corresponding to the between axis distance of the RAM-Mount base reference 6074. You may either assemble your own adapting plate to place between these inserts, either use the standard RAM-Mount accessories we recommend in the price list on our website www.tripy.xx (xx = fr, be, nl, de, co.
Tripy RoadMaster User's Manual See below a few examples of mounting: Honda Goldwing 1500 (6001 + 6074) BMW K1200S (6074 + 6002 + 6009) BMW R1100S (6001 + 6009) BMW F 650 CS (6001 + 6004) BMW R1200RT (6001+ 6008) HD XL1200 Sportser (6001 + 6004) Honda XR200 (6001 + 6004) BMW R1200GS (6001+ 6004) BMW K1200 LT (6001 + 6071 succion cap) BMW R1200ST (6001 + 6008) ©Tripy MAN0004-RevB_EN-RoadMaster_Manual_1.10.x – Rev 1.10.2 - .
Tripy RoadMaster User's Manual 8 GPS receiving system 8.1 Operation of the RoadMaster integrated GPS The RoadMaster integrated GPS receiver can receive and use the signals from up to 12 GPS satellites, calculate the position, speed direction date and time. As soon as RoadMaster is started, the GPS receiving system searches for satellites. To be able to provide valid positioning, RoadMaster shall find signals from at least three usable satellites.
Tripy RoadMaster User's Manual Summary : After powering up RoadMaster and as soon as no GPS reception quality indicator is black, wait in an open sky place without travelling. If RoadMaster holds recent GPS data in its memory, it will quickly be in an operating mode (typically 10 to 90 seconds after power-up). If you travel during the satellite searching operation, RoadMaster may take more time to find them (up to 15 minutes). 8.
Tripy RoadMaster User's Manual 8.4 Reception quality The GPS signal quality broadcast from a satellite constellation is variable by nature. It may happen that signals be temporarily depleted even in an open area. That signal depletion may be originating but not necessarily, from meteorogical conditions. Some temporary reception depletion are originating in high altitude situations independent from meteorogical conditions.
Tripy RoadMaster User's Manual 8.5.1 During navigation (compass or road book) RoadMaster cannot update the distance to the next waypoint (the symbol remains however displayed on the screen) neither update the sniffer arrow nor the compass to the point to reach. Therefore, when the signal is lost for more than 10 seconds, RoadMaster warns the user by alternating the screen display between normal/reverse. This screen flashing remains as long as the satellite reception is not returned to normal.
Tripy RoadMaster User's Manual Correcting the track in RoadTracer by slecting the track segment and using the capture function « Capture track». 8.5.3 Displaying the TripMaster In TripMaster, the total distance is the cumulated distance between GPS positions. When the GPS receiver receives a valid signal, it records a new point every second. Once the signal lost, it memorises the last valid point and will totalise the distance to the next valid point received.
Tripy RoadMaster User's Manual 8.5.4 During “Go To” navigation (towns, home, office, gas stations, point of interest) RoadMaster cannot update the compass direction nor the distance to the next waypoint. Therefore, when the signal is lost for more than 10 seconds, RoadMaster warns the user by alternating the screen display between normal/reverse. This screen flashing remains as long as the satellite reception is not returned to normal. The distance to destination information is not updated.
Tripy RoadMaster User's Manual 9 Main menu The Main menu is the one from wich you choose the operating mode(s). It is the menu RoadMaster displays after having skipped the satellite search screen (except if you were in road book navigation before switching off). Return to the Main menu is done by selecting « Main menu» in one of the submenus selected with(2). Navigate through the Main menu icons by means of the ◄► (3) and (4) navigating knobs.
Tripy RoadMaster User's Manual 10 Configuring your RoadMaster Before using your device, it is recommended to configure it according to your personal preferences. The available sub-menus are : 10.1 Contrast Setting the screen contrats RoadMaster screen contrast is factory preset. You may adjust it here according to your preferences and circumstances. Tuning of the contrast is done by means of the ◄► (3) and (4) navigation knobs. Note : the LCD screen contrast is sensitive to temperature variations.
Tripy RoadMaster User's Manual 10.4 Batteries Tick off this option to adapt the battery management when RoadMaster is connected to the vehicle electrical system. In this mode the automatic loading is conditioned upon the crossing of a minimal voltage level. Attention, if the is marked, loading by means of the external loader is not efficient and the device will not offer its optimal capacity.
Tripy RoadMaster User's Manual In the same menu one can configure the perimetric distance at which one wants to be warned. One may choose between 1000, 500 and 300m. This distance is a perimeter. The larger this distance, the more likely to get a warning for unnecessary detections (i.e. driving on a highway and being warned for control points on secondary roads within the monitoring perimeter).
Tripy RoadMaster User's Manual kilometres. If this option is not ticked off, RoadMaster records 1 GPS point every second, and so, even if it is not necessary (e.g. when waiting at a red light). 10.6.3 Automatic power off Tick off ο Auto Power off Selected by default. If this option is selected, RoadMaster goes automatically idle after 10 minutes of inactivity.
Tripy RoadMaster User's Manual 10.6.6 Anticipation of the zero distance Tick off ο Anticipation ON By default not selected This option allows the anticipation of the distance to the next waypoint by 15m. This setting may be useful for people wishing to anticipate their attention approaching a waypoint. This anticipation may be useful, specifically when riding at a high pace.
Tripy RoadMaster User's Manual 10.7 Information Under this menu entry, one finds : o The address of our website www.tripy.xx (xx = eu, fr, be, lu, nl, de, co.uk) o The RoadMaster firmware version number and release date. This version number is made of 3 positions identifying the various modification levels. Important : Tripy RoadMaster is a continuously evolving product. Our team of engineers aims at permanently improving your RoadMaster functions.
Tripy RoadMaster User's Manual Flickering display with : compass to the POI, name of the POI, straight distance and current speed. Press « » (5) to erase the warning Important remark : Tripy invite you to follow the local speed regulations at the place where you travel. The monitoring function is aiming at increasing your awareness at places where you may be distracted. Tripy cannot provide any warranty about the relevance and updates of the control points.
Tripy RoadMaster User's Manual 3) There is a mobile control point for which you have not been warned. Either you have temporarily lost the satellite signals, either that control point is placed by the authorities at an until now not documented location. Undocumented or hidden control points will remain and RoadMaster warning function will not handle them. If you have identified a regularly used control point, you may write an e-mail to contact_us@tripy.
Tripy RoadMaster User's Manual 12 PC connection The connection between your RoadMaster and your PC is necessary to: Transfer the tracks you have recorded to transform them into road books Load road books into the device (although this is not the only possibility to conduct that operation, see § 13 road book menu) Load the Points Of Interest (POI) files, in particular the gas stations files Update the firmware.
Tripy RoadMaster User's Manual The communication window shows up with, to the left, the content of the PC directory, and to the right, the content of the RoadMaster. To refresh the list of the files contained in the RoadMaster, press the refresh button (this function is automatically performed when one enters the communication function) If the right window remains empty after a refresh operation, it means that you have no file in your RoadMaster (no road book *.trb, neither recording *.
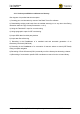
Tripy RoadMaster User's Manual Track recording file (*.ttr) road book file (*.trb) Points of Interest POI file (*.nvo) Beacon road book file out of RoadMaster (*.trb) List of the different files in the RoadMaster.
Tripy RoadMaster User's Manual 12.1 Copy a track recording to your PC Connect your RoadMaster to your PC by means of the USB cable. 1) Start RoadTracer and select , from the main menu. 2) In the left column (displaying the content of your PC hard disk), select the target directory where you would like to copy the record (create a new directory if necessary). 3) If necessary, press the « refresh » button to update the right column displaying the RoadMaster memory content.
Tripy RoadMaster User's Manual You may follow the process by means of the advancement bar graph on the PC as well as on the RoadMaster. If you press « Refresh » in RoadTracer, you shall see that the transferred files are still present on the RoadMaster side: it’s normal, as the process actually makes a copy of the files to prevent any data loss upon an eventual transfer incident. You may voluntarily suppress the file when you are confident that the transfer to the PC has been completed.
Tripy RoadMaster User's Manual 12.2 Copy a road book to your RoadMaster Connect RoadMaster to your PC by means of the USB cable. 12.2.1 road book originating from www.tripy.eu Connect to the Internet on the www.tripy.eu website. In the left hand side menus, select , . When you have selected a road book, press the download icon. Download icon Your browser offers you to save the file to a known location on your PC hard disk.
Tripy RoadMaster User's Manual 12.2.2 road book you have designed The part about copying the file into your RoadMaster is the same as for a file coming from the Internet. This instance is simpler insofar as you recover your own road book where you have saved it after edition (see Hands-On manual or RoadTracer help). 12.2.
Tripy RoadMaster User's Manual 13 road book menu When you press the « » knob (5) while icon is selected in the main menu, you reach the list of road books loaded in the RoadMaster memory (as long as there is a file in it, otherwise, no list is displayed). The list of road books is not sensitive to upper or lower case characters. Each road book is tagged with an icon : «dot-arrow», «compass», «tape» or «beacon points». It indicates the type of file. First you To read the the «» reception.
Tripy RoadMaster User's Manual 13.1 Navigate / Pilot a road book The directory of road books in the RoadMaster shows with an incon the type of recording: User may start navigating a road book either at the starting point or from a distance of it (e.g. from your home). As previously said, launching a road book navigation requires prior sufficient satellite connection (at least one reception indicator darkened at the top of the screen).
Tripy RoadMaster User's Manual Straight distance to the indicated waypoint Location information (town & street) of the indicated waypoint, for as long as the road book editor has completed the corresponding fields in RoadTracer Waypoint number towards which you wish to navigate.
Tripy RoadMaster User's Manual 13.1.3 Playing a road book in the dot-arrow mode When launching a road book at the starting point, the first waypoint description shows up immediately after the properties display (as long as you have satellite connection and are within a close radius to the starting point). When leaving the starting point for a few tens of metres, the scrolling of the various waypoint displays will happen automatically as you progress.
Tripy RoadMaster User's Manual sure that riding at higher speeds, one would not miss the transition. This anticipation factor is described in the § 10.6.6 Anticipation of the zero distance. (*) Note: Do not expect the display of the next waypoint before actually having exited the current road crossing or transition. The device awaits the detection of a new GPS position outside of the transition eventually extended of the hold-up distance to display the next waypoint.
Tripy RoadMaster User's Manual The « 4x4 Compass» may also be selected (press (2) + parameters) to display the bearing in degrees instead of an arrow. 13.1.5 Display trip info1 and trip info2 Trip info1 : - Estimated time to destination, distance to destination, altitude, current time, instantaneous speed, average speed The information « Estimated time to destination» and « distance to destination » are updated even if one leaves the roabook itinerary.
Tripy RoadMaster User's Manual 13.1.6 Display and selection of towns This screen gathers the list of towns the road book is bringing you through. For each town of the list, a small arrow indicates the direction and a kilometres indication the distance to it (along the road book itinerary). By means of the ◄► navigation knobs (3) & (4), you can point to one of these towns of the list and ride to it in compass mode . 13.
Tripy RoadMaster User's Manual 13.3 « Sniffer » arrow In the road book navigation mode (dot-arrow or compass) and as long as you are on the programmed itinerary, a small black arrow is displayed at the top left corner of the screen. This arrow is an additional help to the navigation. It detects the direction of the track ahead of you and helps in guiding you when road transitions may be doubtful.
Tripy RoadMaster User's Manual At the moment you reach the programmed track, RoadMaster displays for a few seconds a so called « connecting arrow » before resuming the normal road book display (RoadMaster always resumes by displaying the dot-arrow symbol after a connection).
Tripy RoadMaster User's Manual 13.6 Delete a road book The “delete” command allows you to suppress from the RoadMaster memory the road books you do not need anymore. You can retain them on your PC where we recommend baking them up. To delete a road book, select « road book » in the main menu; In the list of road books, select the one you want to remove; Press the menu knob (2) and select the « delete» function. Delete confirmation is requested to avoid manipulation errors.
Tripy RoadMaster User's Manual 14.1 Altitude Altitude in meters is displayed with a mountain like icon. The altitude precision is more affected than position or speed by the number of satellites actually tracked. Altitude information becomes particularly inaccurate when the number of tracked satellites is lower than 6. In this instance, the displayed number is indicated with a exclamation mark ( !). The altitude information is available in all the navigation modes. 14.
Tripy RoadMaster User's Manual 14.6 Remaining track distance Displays the distance remaining to travel on the track. The remaining track distance information is not available in the off-route compass navigation mode. 14.7 Waypoint number Displays the number of the waypoint currently aimed at. Useful to follow the sequence of waypoints and/or relate that information to a map (provided you have printed it). The waypoint number information is not available in the off-route compass navigation mode. 14.
Tripy RoadMaster User's Manual 15 Record menu When you press the « » knob (5) after selecting the in the main menu, you obtain the list of recorded tracks currently in the memory of your RoadMaster. If no track is present in the RoadMaster memory the list is empty and a message « Press menu to start a recording» is displayed in the centre of the screen. The list of displayed tracks is sorted by track number.
Tripy RoadMaster User's Manual You may leave this screen to use other RoadMaster functions without intervening in the correct recording operation (and get back to the the recording function at any time to check on the advancement). Recording goes on in the same file as long as it is not deliberately stopped (except in case of low battery when the file is effectively closed before shutting down).
Tripy RoadMaster User's Manual 15.1.3 Pause during recording The easiest way to pause a recording is by switching the device in idle mode by pressing the ON/OFF knob (1). As soon as it will restart, the device will resume recording at the point you have switched it off. One can also, from the « Record » window, press the contextual menu knob (2), select the sub-menu and press the « » knob (5). From then on, the device will stop recording but all functions remain available.
Tripy RoadMaster User's Manual 16 Trip master Pressing the « » knob (5) after selecting the icon in the main menu, brings you to the Trip Master 1, the first independent counter of three. The 3 Trip Masters are completely independent and can be manually set or reset down along the way. To toggle Trip Masters, use the ◄► navigation knobs (3) and (4) or the « » knob (5).
Tripy RoadMaster User's Manual 17 Heading for The mode « Heading for » is where you will find the files with towns, gas stations, your home and/or office as well as all points of interest you may have created and towards which you can travel to. If no .nvo file is present under « Heading for» in the RoadMaster when pressing the « » knob (5), a « TRIPY.NVO » file is automatically created. It contains the position of the Tripy headquarters 17.
Tripy RoadMaster User's Manual To head for a town, you should first select « Heading for » in the main menu. The list of POI’s (points of interest) currently in the RoadMaster is displayed. From that list you find each country name files. Select the file corresponding to your choice (e.g. « Belgium » to navigate towards a Belgian town).
Tripy RoadMaster User's Manual MENU MENU «» When you enter in the « Heading for » function and select a town locations file, the last chosen town is showing up at the screen. By pressing directly the contextual menu knob (2) (to reach the functions section) then « », you will navigate towards that town. On the screen listing the points of interest, the contextual menu knob (2) allows reverting to the main menu. 17.
Tripy RoadMaster User's Manual 17.4 Manual selection of beacons It is possible to edit a beacons road book in RoadMaster by introducing a list of : - GPS coordinates (long/lat) - POI’s (towns or personnal) - or combination of the above. Once the road book so edited, it can be displayed and modified under the function « Heading for » and can also be readily played in compass mode. This function allows the edition of road books without having a PC available.
Tripy RoadMaster User's Manual 17.6 Record the GPS coordinates of your current position Under the « Heading for » menu, a new point of the contextual menu allows the recording of the current position to navigate towards it at a later stage (e.g. record the position of your house). To record a point, select first the function « Heading for » in the main menu. Press then the contextual menu knob (2) and select « Store position ».
Tripy RoadMaster User's Manual 18 Updates Tripy RoadMaster and RoadTracer are continuously evolving products. It could then be that the products have already evolved since your purchase. We highly recommend that you regularly update your RoadMaster firmware (see procedure below). And similarly for the RoadTracer Pro software. 18.1 Firmware upgrade procedure Requirements : PC with internet connection Installed RoadTracer Firmware upgrade file RoadMaster_Vx.x.x.
Tripy RoadMaster User's Manual The first line displays the RoadMaster firmware: « V 1.10.0 » in the above exemple. If your version is prior to 1.10.X, you must first start by updating the RoadMaster firmware prior to updating the GPS micro-code. To perform the RoadMaster firmware upgrade see § 18.1 Firmware upgrade procedure. 18.2.
Tripy RoadMaster User's Manual !! WARNING: make sure RoadMaster have enough battery capacity to run 5 minutes This file is large and the transfer to RoadMaster takes approximately three minutes. At the end of the transfer, leave the communication mode by pressing the menu knob. 18.2.3.3 Activate the micro-code upgrade procedure After transferring the micro-code, enter the « Information» page of the « Configuration » menu: the upgrade procedure starts automatically.
Tripy RoadMaster User's Manual 18.2.4 Upgrade confirmation Check if the RoadMaster GPS micro-code is correctly updated by displaying the « Information» page of the « Configuration » menu. The second row should display the GPS micro-code version as 1.16. If your version is prior to 1.16, it means that the upgrade did not happen correctly. In this instance, resume the procedure. 19 Managing protected road books Version 1.8.0 of the firmware handles protected road books.
Tripy RoadMaster User's Manual 20 2 years manufacturer's warranty Term 1 : Purpose and duration Tripy manufacturer's warranty protects the user against nonconformities or malfunctioning detected on the product within 2 years from its purchase. As soon as the buyer notices a product nonconformity or malfunction, he should inform his reseller without delay.