
User's Manual
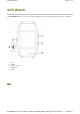
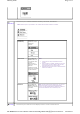

Main Menu
1.
On the main display, long press the Menu button for 2 seconds to return to the main menu.
2. Use the Up and Down buttons to toggle between menu pages, and then press the Menu button once to
select your option.
3. To exit the main menu without selecting any option, long press the Menu button for 2 seconds.
Note: Menu pages will vary upon different models and firmware versions.
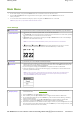
Menu Settings
Counter Reset
This resets the counter on specific GPS main displays, such as Stopwatch, Lap, GPS and etc.
Mode & Power
This allows you to choose a sports mode, or turn off the GPS device.
Power Off
: This turns off the device. When device is turned off or in clock mode, pressing
the menu button for 2 seconds will turn on the device.
Clock: While in clock mode, pressing on the Up or Down button turns on the backlight,
and turns it off while button is let go.
Note: The screen will be turned off automatically to save power when the device is left motionless.
Running/ Cycling/ Travel: Each mode indicates the type of your current
activity in process. Calories consumed are calculated differently in each mode.
Backlight
This allows you to turn ON/OFF the backlight display.
Bluetooth
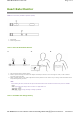
This function can be used to connect and pair with Heart Rate Monitor. Make sure Heart Rate
Monitor has been well set before connecting for the first time. Press Scan and the device will
start searching and getting paired automatically.
If previously paired, simply press Connect to complete connection via Bluetooth.
When the GPS device is turned on and start logging, it will attempt to connect with devices
previously paired automatically.
Note: In order to save power, if Heart Rate Monitor was still being used after device was powered off, the
device will automatically establish bluetooth connection when device is powered on again. Otherwise,
siimply press Connect to start connection manually.
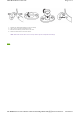
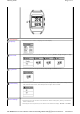
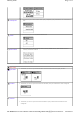
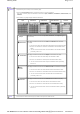
Display Setup
This allows you to customize 6 function pages on the main display, including self-defined
measurement data.
1. Press the Menu key to enable/disable the screen.
2. After enabled, press the Up or Down button to toggle between different data fields.
3. At the highlighted data field, press the Menu key, and the field will start blinkng, indicating
ready for further setting.
4. When the field is blinking, use the Up or Down button to switch between various data
information, and press the Menu key to set the selected data to be displayed.
5. Repeat the steps above to set another function page if needed, or press the Up
button to scroll
back to the last function page defined, and press the Menu
key to save settings and exit. (See
the illustration shown below for more details.)
Page
1
of
6
GT800_menus
2012/10/13
mk:@MSITStore:C:\Documents%20and%20Settings\Paul1106\
桌面
\
Travel%20&%2
...