XMEye Android Mobile Monitoring Client English Manual Written by: The test department Prepared Date: 2014-03-25 Version: V1.
目录 1. 2. 3. Introduction ............................................................................................................................... 3 1.1. Brief Introduction ............................................................................................................. 3 1.2. Main Functions ................................................................................................................ 3 Installation .......................................................................
1. Introduction 1.1. Brief Introduction XMEye is the video surveillance application developed for Android OS. This application supports OS that is higher than 2.3 released. Manual will mainly focus on how to set up and use XMEye software for Android OS. 1.2.
Support audio function; Support real-time intercom; 2. Installation 2.1. Acquire XMEye User can get our app in three ways, one free download from xmeye.net website, the second is downloaded from android market (http://apk.hiapk.com/html/2014/02/2361770.html), third obtained from the manufacturers. As downloading from android market, you can use QR scan tool, scan the QR icon , than install, the application will be installed into your mobile-phone (like 2.1a). 2.
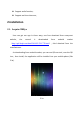
3. Application Running 3.1. Interface Description After successfully installed the application into mobile-phone, just click the XMEye icon to run this application. Access to landing interface, user can log in by user or device (like 3.1a). By user login (like 3.1a): User name and password are same as which user login to Cloud Servers website (http://xmeye.net/) to register. Add and save the devices on server and get the device list after login.
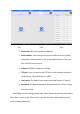
3.1c 3.1d 3.1e Connection: By serial number or address; Serial number: User cann get the serial number from the system information serial-number on PC or the label of devices. User can also click QR scan to access; Address: DVR/IPC IP address or DDNS; TCP port: User can acquire the TCP port in the setting information of the device.
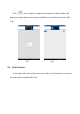
Click “ ” icon on right to change the information of devices (like 3.1f); Keep pressing the device name to get out delete icon, to delete the device (like 3.1g). 3.1f 3.1g 3.2. Live Preview In the upper left corner of the main menu click on “Live Preview” to return to the video player interface(like 3.
3.
Control the directions of the camera Zoom in / Zoom out Focal length control Aperture control 3.3. Main Menu Instruction Access to the main menu by clicking “ ”, and see the corresponding operation options, including device list, photos, local video, options and about etc (like 3.3a): 3.
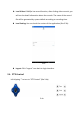
Local Video: If XMEye has record function, after clicking video records, you will see the detail information about the records. The name of the record file will be generated by system default according to recording time. Local Setting: You can check the version of the application (like 3.3b): 3.3b Logout: Click “Logout” turn back to login interface. 3.4. PTZ Control Left slipping “” to turn to “PTZ Control” (like 3.4a) 3.
Function keys of PTZ Control as below: :Control PTZ direction; :Zoom in or Zoom out; :Focal distance control; :Aperture control. 3.5. Local Video These videos will be saved on the phone after recording the videos. Steps an below: [Note]: If the mobile phone has no memory card, video features will not work properly. Play Video: Click “ ” to enter the main menu, select “local video” to enter “local video” list interface (like 3.
3.5a 3.5b Delete: Click “ ” to access the main menu interface, select “record” to access “record” list interface, like 3.5a; Click “Edit”, select the record which need to be deleted(like 3.5b), click “Delete” to delete the record; Click “Cancel” and back to “Local Playback”; Click “Back” to the main menu; [ATTENTION] 1. Recording all the steps in the video operation, the “Finish” button can be terminated, canceled and takes you back to the previous n interface. 2.
3.6. Photo THE photos are the snap-shot when viewing the cameras which saved on the album. You also can check the batch save and delete etc. The steps are the same as 3.4. 3.7. Remote Playback The application can visit the device remotely, collect the records saved from device, to remote playback. Select time, device and channel, then click “Search” and choose any record to playback (like 3.7a). 3.7a 3.8. Intercom You can select the device for real-time bidirectional intercom.
and sound equipment pass over the mobile client can hear, bidirectional intercom clients and devices. Click the button again to end the intercom state. 3.9. Switching language When you switch the language on your phone, the language of the application will be changed as well. Fox example, it’s switched to English on your phone; the language of the application will be switched to English as well.