
Installation Sheet
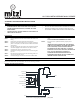
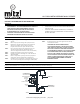
Table Of Contents
- ,HL174101,
- GENERAL
- INSTALLATION
- STEP 1. Un-wrap fixture and screw on the bottom stem to the arm fitting
- STEP 2. Remove the mounting plate from the backplate
- STEP 3. Determine the location for the lamp. Using the mounting plate as a template, mark the location of the holes for the wall anchors.
- STEP 4. Drill the appropriate size holes for the wall anchors (holes should be slightly smaller than the size of the anchors).
- STEP 5. Install the wall anchors, and anchor screws.
- STEP 6. Install the mounting plate to the anchor screws using the key slot
- STEP 7. Place the fixture to the wall over the mounting plate and secure using the set screws.
- STEP 8. Install the lamp(s). The fixture is rated for 4 watt G9 LED lamp.
- DO NOT EXCEED RECOMMENDED WATTAGE!
- STEP 9. Plug cord into a qualified socket of properly rated voltage.
- CLEANING
- ASSEMBLY AND MOUNTING DIAGRAM
- HL174101 M40

HL174101 META
PORTABLE WALL SCONCE
www.hudsonvalleylighting.com/mitzi | #mymitzi
NOTICE D'ASSEMBLAGE ET DE MONTAGE
GENERALITÉ
•
AVERTISSEMENT – TOUJOURS DÉBRANCHER LA LAMPE À LA
PRISE AFIN DE COUPER INTÉGRALEMENT LE CIRCUIT
ÉLÉCTRIQUE AVANT D’INSTALLER, DE NETTOYER OU
D’ENTREPRENDRE TOUT AUTRE ENTRETIEN.
•
UNE INSTALLATION INCORRECTE DU DISPOSITIF PEUT
ENTRAINER DES BLESSURES GRAVES OU LA MORT.
•
VEUILLEZ LIRE TOUTE LA NOTICE AVANT DE PROCÉDER À
L'INSTALLATION.
•
AVANT DE JETER LA BOÎTE D'EMBALLAGE, CONTRÔLER
L'EMBALLAGE POUR S'ASSURER QUE TOUTES LES PIÈCES
ONT ÉTÉ TROUVÉES.
INSTALLATION
PAS 1. Dégagez l’appareil et vissez la tige inférieure au raccord
de bras
PAS 2. Retirer la plaque de montage de la plaque arrière.
PAS 3. Déterminer l’emplacement de la lampe. Utilisant la
plaque de montage comme gabarit, marquer
l’emplacement des trous pour chevilles murales.
PAS 4. Percer des trous de grandeur appropriée pour les
chevilles murales (Les trous doivent être d’une
dimension légèrement inférieure à celle des chevilles).
PAS 5. Installer les chevilles murales et vis de chevilles.
PAS 6. Installer la plaque de montage aux vis de chevilles en
utilisant la fente.
PAS 7. Placer le dispositif à la paroi par-dessus la plaque de
montage et sécuriser utilisant les vis de fixations.
PAS 8. Installer la ou les ampoule(s). Le dispositif est prévu pour
une ou des ampoule(s) de 4 watt de type G9 DEL (LED).
NE PAS DÉPASSER LE WATTAGE RECOMMANDÉ!
PAS 9. Brancher la fiche à une prise approvée avec tension
correctement évaluée.
CONSIGNES DE SÉCURITÉ IMPORTANTES:
CETTE LAMPE PORTABLE A UNE FICHE POLARISÉE
(UNE LAME PLUS LARGE QUE L’AUTRE). CETTE FICHE
PEUT ÊTRE UTILISÉE AVEC UNE PRISE POLARISÉE ET
D’UNE MANIÈRE SEULEMENT. SI LA FICHE NE S’INSÈRE
PAS COMPLÈTEMENT DANS LA PRISE, INVERSER LA
FICHE. SI ÇA NE S’INCÈRE TOUJOURS PAS, ASSUREZ-
VOUS LES SERVICES D’UN ÉLECTRICIEN QUALIFIÉ. NE
JAMAIS UTILISER UNE RALONGE, À MOIN QUE LA
FICHE S’INSÈRE COMPLÈTEMENT. NE JAMAIS
MODIFIER LA FICHE.
NETTOYAGE
A nettoyer UNIQUEMENT avec un chiffon doux et sec! Ne pas utiliser de produits de nettoyage
SCHÉMA D’ASSEMBLAGE ET DE MONTAGE
WALL
WALL ANCHOR
ANCHOR SCREW
GROUND SCREW
KEY SLOT
STEM
MOUNTING PLATE
SETSCREW
BACKPLATE
PLUG
LAMP
ON/OFF SWITCH
AMPOULE
PLAQUE DE MONTAGE
PLAQUE ARRÈRE
VIS DE FIXATION
INTRERUPTEUR
MARCHE/ARRET
FENTE
TIGE
VIS DE MISE À TERRE
VIS DE CHEVILLE
PAROI
CHEVILLE
MURALE
FICHE