
Installation Sheet


www.strasserwood.com —
3
— (800) 445-0494
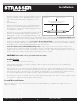
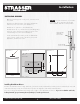
Determine final vanity cabinet top height (excluding counter top)
and center, and mark on wall. Measure down 5¼" to mark
where the beveled Mounting Bar top edge will be on your
wall.
(See illustration 2.)
Determine side-to-side vanity position on your wall. Mounting
lag screws for wood Mounting Bar and upper rear stretcher
must be within 3" of vanity sides and must engage stud centers
or an installed cross member.
Drill 3/8" holes into the wood mounting bar (to allow the 5/16"
lag screws to pull Mounting Bar snugly onto wall). Place the
Mounting Bar in position on the wall again and mark the wall
for drilling into wall studs. Drill 3/16" pilot holes into wall and wall studs for 5/16" lag screws. It is important to drill into stud
center. If installing an ensemble consisting of multiple components, carefully plan mounting bar placement for all cabinets first.
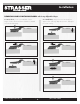
Secure the wood Mounting Bar(s) to the wall. Do not force the wood Mounting Bar to conform with a wall that is not perfectly
flat. Doing so will make it impossible to mate the cabinet to the Mounting Bar. Use shims where necessary. Hang the cabinet(s)
by mating the bevels of the Mounting Bar(s) and cabinet upper rear stretcher(s).
Secure the cabinet(s) to the wall with additional lag screws through the upper and lower rear stretchers. Drill pilot holes
through stretchers into stud centers. Enlarge holes slightly in stretchers so that tightening the lag screws will snug the stretchers
against the wall. Shim where necessary to compensate for a wall that is not flat or plumb. If mounting multiple components, drill
pilot holes and screw components together. We recommend four screws per pairing.
CAUTION! Never stand or sit on your wall mounted SoDo Vanity.
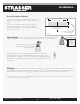
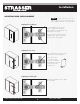
Installing EuroLavs
EuroLav sets are comprised of a base and a top.
Installing a EuroLav Style base is as simple as setting the cabinet in place and levelling with its leveler feet (Wallingford,
Ravenna) or shims (Montlake).
Place the basin top onto the base and check for fit against the wall. There is “play” intentionally built into the base-to-top fit al-
lowing movement to get the best top-to-wall fit. Most likely, you will need to adjust the fit by shimming between the top and the
base for the best fit. Check also that the top is level and shim accordingly. Once you are satisfied with the fit and positioning,
we recommend applying Silicone type bathroom caulk to make a permanent bond between basin and base.
EuroLavs must be secured to a wall stud. Shim if necessary between wall and cabinet if the wall is not exactly straight or plumb,
or if the base is not against the wall with proper basin top wall fit.
Re-install Doors and Drawers
Once your cabinets are in their final positions and secured, re-install and adjust doors and drawers according to directions on
pages (see page 7)
Installation
5¼"
Vanity center line
Final vanity cabinet top position
(excluding counter top)
Illustration 2