
Installation Sheet


www.strasserwood.com —
1
— (800) 445-0494
INSTALLING VANITIES ............................................................................................................
CAUTION! Always remove drawers and doors from your cabinets and and store them away from the work area
during installation (see page 7). This will make your cabinets lighter, easier to move and position, and safer to handle. Drawers
and doors can open unexpectedly and unbalance the cabinet while you are moving it, causing personal injury or damage to your
cabinet. Plus, drawer and door faces will be protected from damage during installation if stored away from your project. Damage
caused during installation is not covered by warranty.
The key to a good installation of any vanity or vanity ensemble is to understand that walls and floors are never exactly level,
plumb, or square.
Securing a vanity or ensemble to your walls is important. However, forcing a square cabinet to fit against not-so-square walls will
distort the cabinet frame and cause drawer and door hardware to mis-align and bind. Never close gaps by overly tightening the se-
curing screws. Always use shims between the cabinet and wall and floor where gaps exist before tightening securing screws. While
our hardware is adjustable to help compensate visually for some mis-alignment, the drawers may not open and close smoothly if
you don’t follow this basic proceedure.
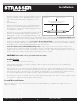
Installing Montlake & Montlake View Vanities and Ensembles
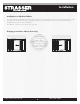
Place your cabinet into approximate position.
If you are installing an ensemble of more than one piece, clamp components together
making sure that they are accurately mated
and the top edges are exactly aligned. Drill pilot
holes and screw components together. We recommend four screws per pairing.
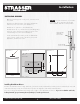
Place the vanity or ensemble into it’s exact final position and level units with shimming underneath
where necessary.
Vanities must be secured to wall studs in at least two positions along the back and one in the side, if the side is against a wall.
Shim where necessary at securing points between wall and cabinet if the wall is not exactly straight or plumb.
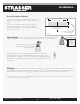
Installing Montlake Linen Uppers
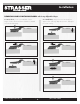
Linen Uppers are always packed “upside down” to prevent damage to the doors that overhang the frame. The doors will cover
the joint where the upper and lower units join. Cut away the box and remove inner wrappings. Remove all wood shipping sup-
ports leaving in place the 90° angle brackets. These brackets will fit inside the lower unit and will be used to secure the Linen
Upper to the Linen Lower. Remove the doors and place well away from your work area (see page 7).
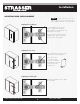
Always have two people lift and position the Linen Upper onto the Linen Lower. Make sure connecting brackets clear Linen
Lower edges and fit into place. Adjust the two Linen halves to mate exactly. From inside the Linen Lower, carefully drill pilot
holes and secure brackets with provided screws.
Additionally, it is especially imperative that any tall cabinet – like a linen cabinet – must be secured to the wall.
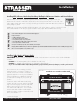
Installation
video
For your convenience, see our installation videos by visiting strasserwood.com and clicking "installation and care."