
Installation Sheet


www.strasserwood.com —
10
— (800) 445-0494
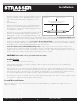
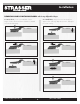
To remove a drawer, open the drawer,
reach under it and pull the release levers
toward the drawer front. The drawer is now
released from the glides. Pull the drawer
box toward you and upward to remove.
To replace, simply set the drawer box onto
the rails and push closed. Drawer will auto-
matically re-engage with the glides.
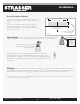
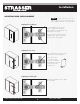
To adjust drawer face alignment begin by
setting the micro adjusters to their middle
position as shown. This will allow you to
fine-tune the face position later.
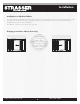
Then, loosen the two indicated screws
inside the drawer box slightly and move the
face to the desired position. Once you are
satisfied, tighten all of these screws on all
drawers.
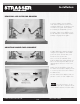
Finally, screw the provided set screws into
the small holes beneath the adjusting screws
to “lock” the position of the faces relative to
the drawer boxes.
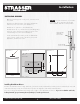
Fine tune with the micro adjusters. Each one
will raise or lower one side of drawer front.
Micro
Adjusters
Drawer Face
Adjusting Screws
Set Screw Holes
Release
Levers
Installation
video
For your convenience, see our
video on this topic. Go to strasserwood.com
click "installation and care" to find our videos.
REMOVING & RE-INSTALLING DRAWERS .............................................................................
ADJUSTING DRAWER FACE ALIGNMENT ..............................................................................