
Installation Sheet

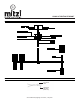
Table Of Contents
- GENERAL
- INSTALLATION
- STEP 1. Thread the wire through stems and twist tightly onto body. Keep adding additional stems required.
- STEP 2. Slide in the canopy to the stem. And thread the swivel into the top end of the stem set.
- STEP 3. Pull the wires out from the outlet box and install mounting plate onto the outlet box using the (2) mounting screws. Strip the fixture wires ½” long at the ends.
- STEP 4. Trim excess wire to min 6” beyond stem, strip to 5/8”.
- STEP 5. Fasten bare ground wire to ground wire from the wall outlet box (usually green or copper color) or connect ground wire to green screw on the mounting plate.
- STEP 6. Connect the neutral (white) fixture wire coming from the fixture base to neutral (usually white) outlet wire. Fasten both wires together with a plastic wire nut and tightly wrap the wire nut with electrical tape.
- STEP 7. Repeat the previous step with the hot (black wires). Make sure there are no exposed wires or strands that could cause a dangerous short circuit.
- FAILURE TO CONNECT THE APPROPRIATE WIRES CORRECTLY COULD RESULT IN SEROIUS INJURY OR DEATH!
- STEP 8. Carefully place connections back into the outlet box.
- STEP 9. Attach the canopy to the mounting plate and secure it with mounting nuts.
- STEP 10. Attach the small glass shades and large glass shades onto the fixture.
- STEP 11. Install the lamp(s). The fixture is rated for 20-watt type G9 xenon lamp.
- DO NOT EXCEED RECOMMENDED WATTAGE!
- STEP 12. Restore power to the circuit at breaker or fuse-box.
- DIMMING
- CLEANING
- ASSEMBLYANDMOUNTINGDIAGRAM
- WIRE NUT/TAPINGDIAGRAM
