
Installation Sheet

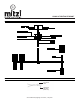
Table Of Contents
- GENERAL
- INSTALLATION
- STEP 1. Thread the wire through stems and twist tightly onto body. Keep adding additional stems required.
- STEP 2. Slide in the canopy to the stem. And thread the swivel into the top end of the stem set.
- STEP 3. Pull the wires out from the outlet box and install mounting plate onto the outlet box using the (2) mounting screws. Strip the fixture wires ½” long at the ends.
- STEP 4. Trim excess wire to min 6” beyond stem, strip to 5/8”.
- STEP 5. Fasten bare ground wire to ground wire from the wall outlet box (usually green or copper color) or connect ground wire to green screw on the mounting plate.
- STEP 6. Connect the neutral (white) fixture wire coming from the fixture base to neutral (usually white) outlet wire. Fasten both wires together with a plastic wire nut and tightly wrap the wire nut with electrical tape.
- STEP 7. Repeat the previous step with the hot (black wires). Make sure there are no exposed wires or strands that could cause a dangerous short circuit.
- FAILURE TO CONNECT THE APPROPRIATE WIRES CORRECTLY COULD RESULT IN SEROIUS INJURY OR DEATH!
- STEP 8. Carefully place connections back into the outlet box.
- STEP 9. Attach the canopy to the mounting plate and secure it with mounting nuts.
- STEP 10. Attach the small glass shades and large glass shades onto the fixture.
- STEP 11. Install the lamp(s). The fixture is rated for 20-watt type G9 xenon lamp.
- DO NOT EXCEED RECOMMENDED WATTAGE!
- STEP 12. Restore power to the circuit at breaker or fuse-box.
- DIMMING
- CLEANING
- ASSEMBLYANDMOUNTINGDIAGRAM
- WIRE NUT/TAPINGDIAGRAM

H384816 TABITHA PENDANT
www.hudsonvalleylighting.com/mitzi| #mymitzi
ASSEMBLY AND MOUNTING INSTRUCTIONS
GENERAL
•
WARNING-DISCONNECT POWER BEFORE RELAMPING OR
WIRING THE FIXTURE. TURN OFF THE ENTIRE ELECTRICAL
CIRCUIT TO WHICH THE LIGHTING FIXTURE IS ATTACHED
•
INSTALLATION AND MAINTENANCE OF THIS FIXTURE
SHOUILD BE COMPLETED BY A LICESNSED ELECTRICAN
•
FAILURE TO INSTALL FIXTURE CORRECTLY COUD RESULT
IN SEROIUS INJURY OR DEATH
•
READ ALL INSTRUCTIONS BEFORE STARTING
INSTALLATION.
•
IF AN EXISTING FIXTURE IS BEING REPLACED, REMOVE IT
AND NOTE TO WHICH WIRE IN THE OUTLET BOX THE
ORIGINAL FIXTURE WAS ATTACHED.
•
BEFORE DISCARDING THE CARTON DOUBLE CHECK THE
PACKAGING TO MAKE SURE ALL PARTS HAVE BEEN
FOUND.
•
THIS FIXTURE WAS DESIGNED TO BE MOUNTED TO AN
OCTAGON OUTLET BOX. THE BOX MUST BE SECURELY
MOUNTED TO THE STRUCTURE OF THE BUILDING.
INSTALLATION
STEP 1. Thread the wire through stems and twist tightly onto body.
Keep adding additional stems required.
STEP 2. Slide in the canopy to the stem. And thread the swivel into
the top end of the stem set.
STEP 3. Pull the wires out from the outlet box and install mounting
plate onto the outlet box using the (2) mounting screws.
Strip the fixture wires ½” long at the ends.
STEP 4. Trim excess wire to min 6” beyond stem, strip to 5/8”.
STEP 5. Fasten bare ground wire to ground wire from the wall outlet
box (usually green or copper color) or connect ground wire
to green screw on the mounting plate.
STEP 6. Connect the neutral (white) fixture wire coming from the
fixture base to neutral (usually white) outlet wire. Fasten
both wires together with a plastic wire nut and tightly wrap
the wire nut with electrical tape.
STEP 7. Repeat the previous step with the hot (black wires). Make
sure there are no exposed wires or strands that could
cause a dangerous short circuit.
FAILURE TO CONNECT THE APPROPRIATE WIRES
CORRECTLY COULD RESULT IN SEROIUS INJURY OR
DEATH!
STEP 8. Carefully place connections back into the outlet box.
STEP 9. Attach the canopy to the mounting plate and secure it with
mounting nuts.
STEP 10. Attach the small glass shades and large glass shades onto
the fixture.
STEP 11. Install the lamp(s). The fixture is rated for 20-watt type G9
xenon lamp.
DO NOT EXCEED RECOMMENDED WATTAGE!
STEP 12. Restore power to the circuit at breaker or fuse-box.
DIMMING
The fixture can be controlled by a wall dimming device. Only use
triac/electronic dimmer. Make sure carton is marked for use with LED
compact fluorescent-incandescent light source only. These can be
provided by your local electrical distributor, home center, or hardware
store.
CLEANING
Please clean with a soft, dry cloth ONLY! Do not use cleaning products.