ENGLISH ESPAÑOL ITALIANO DEUTSCH FRANÇAIS LCD Projector User Manual XL2 MODEL XL2U EN – 1
CAUTION RISK OF ELECTRIC SHOCK DO NOT OPEN CAUTION: TO REDUCE THE RISK OF ELECTRIC SHOCK, DO NOT REMOVE COVER (OR BACK) NO USER-SERVICEABLE PARTS INSIDE REFER SERVICING TO QUALIFIED SERVICE PERSONNEL. The lightning flash with arrowhead symbol, within an equilateral triangle, is intended to alert the user to the presence of uninsulated “dangerous voltage” within the product’s enclosure that may be of sufficient magnitude to constitute a risk of electric shock.
ENGLISH Contents Important safeguards ...........................................................................4 Overview ............................................................................................... 6 Using the remote control ......................................................................8 Battery installation ......................................................................................................... 8 Installation .................................................
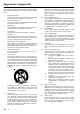
Important safeguards Please read all these instructions regarding your LCD projector and retain them for future reference. Follow all warnings and instructions marked on the LCD projector. 1. Read instructions All the safety and operating instructions should be read before the appliance is operated. 2. Retain instructions The safety and operating instructions should be retained for future reference. 3. Warnings All warnings on the appliance and in the operating instructions should be adhered to. 4.
Do not operate if smoke, strange noise or odor comes out of your projector. It might cause fire or electric shock. In this case, unplug immediately and contact your dealer. Never remove the cabinet. This projector contains high voltage circuitry. An inadvertent contact may result in an electric shock. Except as specifically explained in the Owner's Guide, do not attempt to service this product yourself. Please contact your dealer when you want to fix, adjust or inspect the projector.
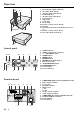
Overview 11 10 9 5 8 1 2 3 4 5 6 7 8 9 10 11 12 Front height adjuster buttons Air outlet grille (Front) Air inlet grille (Side-Front) Terminal board Air inlet grille (Side-Rear) Control panel RIS sensor Zoom ring Focus ring Remote control sensor (Front) Speaker Kensington Security Lock Standard connector 13 Remote control sensor (Rear) 14 Air outlet grille (Side-Rear) 6 7 4 2 3 1 13 12 14 Control panel 12 11 VOLUME LAMP 9 COMPUTER AUTO POSITION MUTE 2 3 8 7 MENU ENTER 5 6 SOURCE VI
2 1 2 Lamp cover Adjustment foot Caution: Do not replace the lamp right after using the projector. The lamp is very hot.
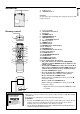
Using the remote control Battery installation Use two AA size batteries. 1. Remove the back cover of the remote control by pushing the battery compartment door in the direction of the arrow. 2. Load the batteries making sure that they are positioned correctly (+ to +, and - to -). • Load the batteries from - spring side, and make sure to set them tightly. 3. Replace the back cover. 1 2 3 Important: • Do not combine a new battery with an old one. • Load batteries in the correct position.
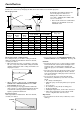
Installation Height Picture size can be set by changing the distance between the screen and the projector. Front projection To find the approximate distance between the projector and screen: Width Screen Multiply the width of the screen A B x 1.8 (min.) , Multiply the width of the screen x 2.2 (max.). Screen • Refer to the chart for recommended distances in maximum zoom and A=B minimum zoom.
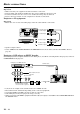
Basic connections This projector can be connected to equipment such as PC, VCRs, video cameras and DVD players. Important: • Make sure that your equipment is turned off before connection. • Plug in firmly and unplug by holding the plug, not by pulling the AC power cord. • If connected units are set too close to one another, the image may be affected. • Refer to the user manual of each component for details of connections.
ENGLISH Projector + Personal computer RGB cable for PC to COMPUTER IN computer S-VIDEO RS-232C MAIN L COMPUTER IN R USB VIDEO AUDIO IN VIDEO IN AC IN COMPUTER OUT to monitor port to COMPUTER OUT to AUDIO IN PC audio cable (option) to PC audio output AUDIO OUT MONITOR OUTPUT RGB cable for PC (option) When outputting to both a PC monitor and the projector. Important: • When you use a long RGB cable instead of the cable provided, the picture quality may be deteriorated.
Preparing the projector for operation Getting ready for projection Adjusting the angle of projection 1. Connect the power cord provided to the projector. 2. Connect the power cord to the wall power outlet. 3. Remove the lens cap. For the best result, project onto a flat screen with a 90 degree angle to the floor. If necessary, tilt the projector by adjusting two foot adjustments on the bottom of the projector. Warning: • Do not look directly into the lens when projector is “ON”.
ENGLISH To operate projector power ON 2•9 S-VIDEO RS-232C MAIN L COMPUTER IN R USB 3•7•8 VIDEO AUDIO IN VIDEO IN AC IN COMPUTER OUT COMPUTER VIDEO KEYSTONE EXPAND 1 2 P in P AUTO POSITION VOLUME 3•7•8 4 COMPUTER LAMP TEMP VOLUME AUTO POSITION button MUTE button AUTO POSITION + MENU R-CLICK ENTER MUTE STILL 16 : 9 MUTE MUTE button SOURCE VIDEO LASER – 4 AUTO POSITION button MENU ENTER 1. Turn on the equipment connected to the projector. 2.
To operate projector power ON (Continue) Turning off the projector 7. Press the POWER button. The message “POWER OFF? YES : PRESS AGAIN” appears on the screen. • To exit from this mode, press any button except the POWER button. (Some buttons on the remote control do not work for exit from this mode.) 8. Press the POWER button again. The light source lamp will be turned off.
Menu operation CONTRAST BRIGHTNESS sRGB COLOR MATRIX *1 COLOR TEMP.
Menu operation (continued) 1 IMAGE opt. CONTRAST ........ Adjusts the picture contrast. The contrast becomes higher as XGA60 the number increases. IMAGE BRIGHTNESS .... Adjusts the image brightness. The image becomes brighter as CONTRAST 0 the number increases. BRIGHTNESS 0 sRGB ................... Select ON to display an image emphasizing on the color OFF sRGB reproducibility. COMPUTER COLOR MATRIX • When sRGB is ON, COLOR MATRIX, COLOR TEMP. COLOR TEMP. STANDARD and GAMMA MODE can’t be adjusted.
A A A A • When SCART is set to ON, nothing is output to the external monitor. • When SCART is set to ON, normal computer signals are not projected. • Use SCART-Mini D-SUB 15P cable (option), when connecting with AV device equipped with the SCART terminal. • Some AV devices equipped with the SCART terminal may not be compatible with the projector. • When VIDEO SIGNAL is set to AUTO, the image may not be projected with correct colors.
Picture adjustment User memory for signal setting This projector can memorize the maximum of 2 signal menu settings. Memorizing the setting 1. Select MEMORIZE in the SIGNAL menu, and press the ENTER button. 2. Press the $ or % button to select the memory which you wish to record (USER 1 or USER 2). 3. Press the ENTER button. • Any buttons are ineffective about 3 seconds of recording setting. Wait for recording to have been completed before operating the buttons.
1. Select COLOR TEMP in IMAGE menu. 2. Press the $ or % button to select USER . 3. Press the ENTER button. Image flickers / Image is out of focus : Adjust FINE SYNC. in SIGNAL menu. COLOR TEMP.-USER CONTRAST R 0 CONTRAST B 0 BRIGHTNESS R 0 BRIGHTNESS B 0 4. Press the { or } button to select the desired item. 5. Press the $ or % button to adjust the item. 6. Repeat steps 4 and 5 for more adjustments. 7. Exit the menu system by pressing the MENU button several times.
Advanced features for presentation Expand Picture in Picture (PinP) By pressing the EXPAND button on the remote control, you can magnify the detailed image of the picture. You can also view the screen displaying the picture as its original size (native resolution display). One of the special features of this unit is the picturein-picture (PinP) mode. PinP allows you to view different sources at the same time. Setting the Expand mode 1. Press the MENU button. 2.
By connecting to personal computer through the USB or PS/2 port, you can operate your computer with the projector remote control. Connection Projector + PC with USB connector to USB to USB port S-VIDEO RS-232C MAIN L USB cable COMPUTER IN R USB VIDEO AC IN AUDIO IN VIDEO IN COMPUTER OUT USB 4P (type A) USB 4P (type B) • You can use the mouse remote control function with computer supported USB only.
Lamp replacement The lamp is designed to project the image on the LCD panels. When the lamp no longer functions, replace it with a new one. 9. Tighten up the screws of the lamp lid (a) using a phillips screwdriver (+). Caution: • Do not remove the lamp immediately after turning off the lamp of the projector, you may get burned because of the high temperature of the lamp.
Maintenance Cleaning the air-filter Cleaning the lens Use a standard lens-cleaning brush or a piece of lens tissue dampened with lens cleaning fluid. The lens surface is fragile. Use only recommended, nonabrasive lenscleaning materials. Do not touch the lens with your fingers. Clean the air-filter frequently. If the filter or ventilation grille become clogged with dirt or dust, the temperature inside the projector may rise and shut off the power (the TEMP indicator starts to blink red). 1.
Troubleshooting The following offers solutions to some of the common problems you may encounter. We suggest that you consult this chart before contacting your dealer. PROBLEMS The power is off. CAUSE • The air inlet grille, outlet grille or air filter is clogged with dust or some objects. POWER indicator does not light up. • Power cord is unplugged from the outlet. • Power cord is disconnected from the projector. • The main switch is turned off. • The lamp lid is open. POWER indicator blinks red.
The projector has three LED Indicators which shows the working condition of the projector. The following offers solutions to possible problems. If a problem persists, turn the projector off and consult your dealer.
Specifications Type Model Rated power supply Rated input LCD panels LCD projector XL2U AC100V - 240V, 50 / 60Hz 2.3 A 0.7-inch LCD panel: 3 pieces (for R, G, B) Pixels 1,024 × 768 = 786,432 pixels Total 2,359,296 pixels Active pixel rate: 99.99 % or more (each panel) Colors Projection lens Light source lamp Picture size PC compatibility 16,770,000 colors F 1.9 - 2.
PC analog RGB input Use to input video signals (analog 10 RGB) of a personal computer. 5 12 1 RS-232C input 6 15 11 (Pin assignment of Mini D-SUB 15P jack) 3 5 Use to control the projector with the personal computer, or control the 6 8 personal computer with remote control. Use the provided RS-232C cable (Mini DIN 8P-D-SUB 9P) for the connection. PIN NO. SPEC PIN NO.
Specifications (continued) Specification of RGB signals in each computer mode of the projector Signal mode TV60 TV50 1080i 525p 625p 720p PC98 CGA70 CGA84 CGA85 VGA60 VGA72 VGA75 VGA85 VGA120 SVGA56 SVGA60 SVGA72 SVGA75 SVGA85 SVGA95 SVGA120 XGA43i XGA60 XGA70 XGA75 XGA85 XGA120 SXGA70a SXGA75a SXGA85a SXGA60b SXGA75b SXGA43i SXGA60 SXGA75 MAC13 MAC16 MAC19 MAC21 HP75 HP72 SUN66a SUN76a SUN66 SUN76 SGI72 SGI76 IBM60 resolution (H x V) – – – – – – 640 x 400 640 x 400 640 x 400 640 x 400 640 x 480 640 x 480