
Operation Manual


EN-19
Basic operation (continued)
Watching 3D content
You can enjoy 3D content with this projector. In order
to watch 3D content, you need to have the following
items:
• 3Dimagesinputtedfromacomputer,DVDplayer,
Blu-ray player, etc.
• DLP™Link™active3Dglasses
Important:
• Some3Dglassesmaynotworkwiththisprojector.
Ask the dealer for details.
This projector supports the following 3D image
formats:
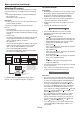
• Framepacking:
The format which transmits the images maintaining
the original resolution including the signals for right
and left.
• Sidebyside:
The format which displays the images with the half
of the original resolution for the left eye and the
right eye side-by-side in one frame.
•
Top and bottom
:
The format which displays the images with the half
of the original resolution for the left eye and the
right eye at the top and bottom in one frame.
• Framesequential(eldsequential):
The format which displays alternately the images
for the left eye and the right eye.
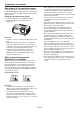
R
L
DLP™ Projector
The shutter timing of the 3D
glasses is controlled by
being synchronized with
switching of right and left
3D image which is detected
by the sensor of glasses.
DLP™ Link™ active
3D glasses
Sensor
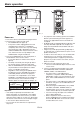
Frame sequential
(field sequential)
Top and bottomFrame packing Side by side
L
R
L
R
L
R
L
R
LR
3D image format
For details about the supported 3D image signal
formats, see “3D supported signals” on page 71.
To view 3D images:
Preparation:
• Switchingthe3Dmode(suchas3Dsettingsystem)
of the player may be required when projecting 3D
images from the player supporting 3D display.
Read the user manual of the player for details.
1. Project a 3D image on the screen inputted from a
computer, DVD player, or Blu-ray player.
2. Display the Picture menu. (See page 22 for menu
setting.)
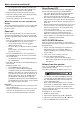
3. Press the or button to select 3D.
3D
Auto
4. Press the or button to select the setting
appropriate for the input signal and press the
ENTER button.
• Auto (for HDMI input only):
Select this setting normally when 3D images are
inputted from the HDMI terminal. (3D images are
displayed automatically when the input signal
includes the 3D identification signal.)
• SidebySide :
Select this setting when 3D images are inputted
in the side by side format.
• TopandBottom :
Select this setting when 3D images are inputted
in the top and bottom format.
• FrameSequential :
Select this setting when 3D images are inputted
in the frame sequential format.
• Off :
Select this setting when 2D images (normal
images) are inputted.
3. Turn the power switch on the 3D glasses to ON and
wear the 3D glasses.
4. If the contents are not projected correctly, switch
3D Sync Invert in the Picture menu to On.
3D Sync Invert
On
Important:
• Youcanselectthe3Dsettingalsobyusingthe3D
button on the remote control. Press the 3D button
to select the setting and press the ENTER button.
• Evenwhenthe3DoptionissettoAuto and a
3D image is inputted from the HDMI terminal, the
3D image is not displayed if the input signal does
not include the 3D identification signal. In such a
case, change the setting to Side by Side , Top and
Bottom , or Frame Sequential according to the
format of the input signal.
• Thesignalslistedinthetableonpage71canbe
displayed in 3D format. You cannot view other
signals in 3D format even when you set 3D in the
Picture menu to Auto , Side by Side , Top and
Bottom , or Frame Sequential .
• Youcannotprojectthe3Dcontentfromtheinput
source LAN Display, USB Display, and PC Less
Presentation.