
User`s guide


installation directory. If it does not end in .ddp, or if it is not placed in the
DAQFactory directory, it will not be loaded the next time you start DAQFactory.
Once you have specified the protocol name and file name, you can begin creating
the protocol. Let’s jump right in with an example. Let’s say you have a scale that
simply outputs the weight every second as a number followed by a carriage return.
To parse this data and put it in a channel we would add the following code to the
OnReceive event of your protocol:
if (strIn == Chr(13))
private string datain = ReadUntil(13)
Channel.AddValue(strDevice, 0, "Input", 0, StrToDouble(DataIn))
Endif
The OnReceive event is called every time a character is received on the port. The
character received is passed to the event in the strIn variable. In the first line
above, we look to see if the last character received is a carriage return. The chr()
function simply creates a string with the given ASCII character, in this case ASCII
code 13 which is carriage return. If the character received is not a carriage return,
we don’t do anything. If it is, we use the ReadUntil() function to read all the
characters accumulated so far up until the carriage return. Then we parse the
data and put it into a channel using the Channel.AddValue() function. We parse
the data with the StrToDouble() function. This function simply takes the string
response and converts it to a number. The AddValue() function takes 4
parameters that describe the channel to put the data into (the device type, device
number, I/O type, and channel number), and the data point. The strDevice
variable contains the name of the device the user created using your protocol.
This is not known ahead of time, so you have to use this variable. A device and
channel number of 0 was chosen arbitrarily. The I/O type of Input was also
chosen arbitrarily. In order for the user to be able to create a channel with this
I/O type though, we need to add this I/O type to our protocol. To do this, we
simply click the Add I/O type button and enter Input for the name. The rest can
be left in its defaults. We don’t have to put any code in this I/O type. We just
need it to exist so the user can create a channel.
To use this protocol we have to apply the it to our new serial / Ethernet device.
First close the protocol configuration window by hitting OK. This will save the new
protocol. Now in the device configuration window, check your communication port
and put a check next to your new protocol. Give your device a name, say,
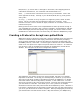
MyDevice, and hit OK. Now if you go to the channel table and create a new
channel you will see MyDevice listed in combo box in the Device column. If you
select the MyDevice device type you will see Input in the I/O type column. The
D# and Channel number have to be 0 because of how we coded the AddValue()
function above. You should select a timing of 0 since there is no polling in this
protocol. If data were received in the proper format, data would automatically
appear in your channel when you hit Apply.
Multiple points on a single line:
Often the device streams multiple data points in a single line. For example, your
device might output two values separated by a comma and followed by a carriage
return. The code is almost the same:
if (strIn == Chr(13))
private string datain = ReadUntil(13)