
User`s guide

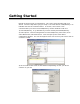
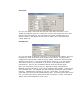

This window is very similar to the user device window, but that is not terribly
important at this time. At the top you should specify a name for your protocol.
This can be just about anything, though like all names in DAQFactory, it should
start with a letter and have only letters, numbers, or the underscore. You will
also have to specify a file name for the protocol. Protocols are stored separate to
your document in a text file. This allows you to use a protocol on multiple
documents and even share the protocol with other DAQFactory users. Because it
is stored in a separate file you will need to make sure and copy the protocol file if
you move your document to another computer. When specifying the protocol file,
you should make sure that the file ends in .ddp and stored in your DAQFactory
installation directory. If it does not end in .ddp, or if it is not placed in the
DAQFactory directory, it will not be loaded the next time you start DAQFactory.
Once you have specified the protocol name and file name, you can begin creating
the protocol. In a poll / response protocol, DAQFactory will send a command to
your device (polling it) and your device will send some data or an
acknowledgment back (the response). Fortunately, DAQFactory provides just the
function for doing this sort of thing. When you first create your protocol,
DAQFactory will automatically create several functions. Four of them are events
and start with “On” and we’ll talk about them later as they are only for advanced
protocols. The last is called “Poll”. Not only is the function created, but
DAQFactory even writes the function for you. You can click on Poll in the function
list and see the code. This was done to allow advanced users to tweak their
polling, or to use this script as a template for more advanced serial protocols. For
now, we’ll just use the function as is.
As an example, let’s say when your device gets the letter D followed by a carriage
return, it will respond with a data value and a carriage return. So, we need to
send the command D + carriage return, and then listen for the response. To
make the protocol easy to use, we also want this to be an I/O type so we can
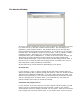
assign it to a channel. To create a new I/O type for this protocol, click on the Add
I/O Type button. A new window will appear: