
Indoor Service Manual

34 35
OCH640D
10
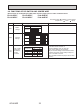
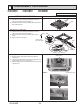
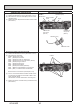
FUNCTION SETTING
10-1. UNIT FUNCTION SETTING BY THE REMOTE CONTROLLER
Each function can be set as necessary using the remote controller. The setting of function for each unit can only be
done by the remote controller.
(1) Functions available when setting the unit number to 00
Refer to the service manual that comes with each outdoor unit.
(2) Functions available when setting the unit number to 01–03 or AL (07 in case of wireless remote controller)
Function Settings Mode No.
Setting
No.
Initial setting Setting
Filter sign
100 Hr
07
1
2500 Hr 2
○
No lter sign indicator 3
Fan speed
Silent (low ceiling)
08
1
Standard 2
○
High ceiling 3
No. of air outlets
4 directions
09
1
○
3 directions 2
2 directions 3
Installed options
(High-eciency lter)
Not supported
10
1
○
Supported 2
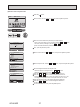
Up/down vane setting
Downward setting (vanes angle setup
3
)
11
1
Middle setting (vanes angle setup
1
) 2
○
Draft-less setting (vanes angle setup
2
)*
1
3
3D i-See sensor positioning
Position
1
12*
2
1
Position
2
2
Position
3
(Default) 3
○
3D i-See sensor ceiling height setting
(when installing the 3D i-See sensor
panel)
Low ceiling (ceiling height: less than 2.7m [8.9 ft])
26
1
Standard (ceiling height: 2.7–3.5 m [8.9–11.5 ft]) 2
○
High ceiling (ceiling height: 3.5–4.5 m [11.5–14.8 ft]) 3
Fan speed during the cooling thermostat
is OFF
Setting fan speed
27
1
○
Stop 2
Extra low 3
*
1
Because condensation may form, do not use this setting in a high-temperature, high-humidity environment.
*
2
When the 3D i-See sensor corner panel position is changed, change this mode. For more details, refer to the Installation Manual.