
Indoor Installation Manual


12
7. Test run
7.1. Before test run
►Aftercompletinginstallationandthewiringandpipingoftheindoorand
outdoor units, check for refrigerant leakage, looseness in the power sup-
ply or control wiring, wrong polarity, and no disconnection of one phase
in the supply.
►Usea500-voltmegohmmetertocheckthattheresistancebetweenthepower
supplyterminalsandgroundisatleast1.0MΩ.
►Donotcarryoutthistestonthecontrolwiring(lowvoltagecircuit)terminals.
Warning:
Donotusetheairconditioneriftheinsulationresistanceislessthan1.0MΩ.
7.2. Test run
7.2.1. Using wired remote controller.
■ Makesuretoreadoperationmanualbeforetestrun.(Especiallyitemstosecuresafety)
Step 1 Turn on the power.
● Remotecontroller:Thesystemwillgointostartupmode,andtheremotecontrollerpowerlamp(green)and“PLEASEWAIT”willblink.Whilethelampandmessageare
blinking, the remote controller cannot be operated. Wait until “PLEASE WAIT” is not displayed before operating the remote controller. After the power is turned on, “PLEASE
WAIT” will be displayed for approximately 2 minutes.
● Indoorcontrollerboard:LED1willbelitup,LED2willbelitup(iftheaddressis0)oroff(iftheaddressisnot0),andLED3willblink.
● Outdoorcontrollerboard:LED1(green)andLED2(red)willbelitup.(Afterthestartupmodeofthesystemnishes,LED2willbeturnedoff.)Iftheoutdoorcontroller
board uses a digital display, [- ] and [ -] will be displayed alternately every second.
If the operations do not function correctly after the procedures in step 2 and thereafter are performed, the following causes should be considered and eliminated if they
are found.
(The symptoms below occur during the test run mode. “Startup” in the table means the LED display written above.)
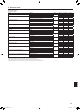
Symptoms in test run mode
Cause
Remote Controller Display
OUTDOOR BOARD LED Display
< > indicates digital display.
Remote controller displays “PLEASE WAIT”, and
cannot be operated.
After “startup” is displayed, only green lights
up. <00>
• After power is turned on,“PLEASE WAIT” is displayed for2
minutes during system startup. (Normal)
After power is turned on, “PLEASE WAIT” is dis-
played for 3 minutes, then error code is displayed.
After “startup” is displayed, green(once) and
red(once) blink alternately. <F1>
• Incorrectconnectionofoutdoorterminalblock(R,S,TandS
1
,
S
2
, S
3
.)
After “startup” is displayed, green(once) and
red(twice) blink alternately. <F3, F5, F9>
• Outdoorunit’sprotectiondeviseconnectorisopen.
No display appears even when remote controller
operation switch is turned on. (Operation lamp
does not light up.)
After “startup” is displayed, green(twice) and
red(once) blink alternately. <EA. Eb>
• Incorrectwiringbetweentheindoorandoutdoorunit(Polarityis
wrong for S
1
, S
2
, S
3
.)
• Remotecontrollertransmissionwireshort.
After “startup” is displayed, only green lights
up. <00>
• Thereisnooutdoorunitofaddress0.(Addressisotherthan0.)
• Remotecontrollertransmissionwireopen.
Display appears but soon disappears even when
remote controller is operated.
After “startup” is displayed, only green lights
up. <00>
• Aftercancelingfunctionselection,operationisnotpossiblefor
about 30 seconds. (Normal)
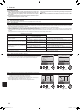
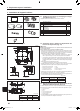
Step 2 Switch the remote controller to “Test run”.
1 Select “Test run” from the Service menu, and press the [SELECT] button. (Fig. 7-1)
2 Select “Test run” from the Test run menu, and press the [SELECT] button. (Fig. 7-2)
3 The test run operation starts, and the Test run operation screen is displayed.
F1 F2 F3 F4
Cool
Pipe
Auto
Switch disp.
Mode Fan
RemainTest run
Fig.7-3
F1 F2 F3 F4
unem ecivreS
rosruC
:unem niaM
Test run
Input maintenance info.
Function setting
Check
Self check
Fig. 7-1
F1 F2 F3 F4
Test run menu
Cursor
Service menu:
Test run
Drain pump test run
Fig. 7-2
F1 F2 F3 F4
Remain
Vane
Fig.7-4
Step3 Performthetestrunandchecktheairowtemperatureandautovane.
1 Press the [F1] button to change the operation mode. (Fig. 7-3)
Cooling mode: Check that cool air blows from the unit.
Heating mode: Check that warm air blows from the unit.
2 Pressthe[SELECT]buttontodisplaytheVaneoperationscreen,andthenpress
the [F1] and [F2] buttons to check the auto vane. (Fig. 7-4)
Pressthe[RETURN]buttontoreturntotheTestrunoperationscreen.
BH79D659K02.indb 12 2017/05/22 17:25:30