
Specifications


91
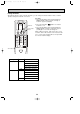
5 Selecting the setting number
Refer to (2) and change the setting of power supply and voltage with ▼ C
button and ▲ D button .
(see diagram 6). Direct the wireless remote controller toward the sensor of
the indoor unit and press the button B.
(2) setting number “01” = 240V
(2) setting number “02” = 220V/230V
➜ “00” will flash in the setting number display (see diagram 7).
The sensor-operation indicator will flash and beeps will sound to indicate
the setting number that you entered.
Setting number : 1 = 2 beeps (0.4-seconds each)
2 = 2 beeps (0.4-seconds each, repeated twice)
(When the setting number is 02.)
3 = 2 beeps (0.4-seconds each, repeated three times)
* If a setting number that cannot be recognized by the unit is entered, three
beeps (3 beeps of 0.4 seconds duration) will be heard (unit will beep
only). Press the button F and start over from the procedure for
entering the unit number.
* If the signal was not received by the sensor or an error occurred during
transmission, you will not hear a beep or a “double beep” may be heard.
Press the button F and start over from the procedure for entering
the unit number.
6 To select multiple functions continuously
Repeat steps 3, 4 and 5 to change multiple function settings continuous-
ly.
7 Complete function selection
Direct the wireless remote controller toward the sensor of the indoor unit and
press the button E.
➜ , and will start to flash.
Set the Nrm/Set switch of the remote controller to Nrm.
* Do not use the wireless remote controller for 30 seconds after complet-
ing the function selection (the unit will not operate).
Note:
Whenever changes are made to the function settings after construction
or maintenance, be sure to record the added functions with an “ ”, in
the “Check” column provided on the chart.
FUNCTION
TEST RUN
CHECK
HR
START
START
Diagram 6
00
Diagram 7
02
Setting number
0
1
Setting number
0
4
Diagram 4
Diagram 5
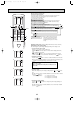
4 Selecting a mode
Enter 04 to change the power voltage setting using the ▲ C and ▼ D but-
tons (see diagram 4). Direct the wireless remote controller toward the sen-
sor of the indoor unit and press the button B.
➜ “01” will flash in the setting number display (see diagram 5).
The sensor-operation indicator will flash and beeps will sound to indicate
the current setting number relative to the selected mode number.
Current setting number : 1 = 1 beep (one second)
2 = 2 beeps (one second each)
3 = 3 beeps (one second each)
* If a mode number that cannot be recognized by the unit is entered, three
beeps (3 deeps of 0.4 seconds duration) will be heard. Press the
button F and reenter the mode number setting.
* If the signal was not received by the sensor or an error occurred during
transmission, you will not hear a beep or a “double beep” may be heard.
Press the button F and start over from the procedure for entering
the unit number.
HR
START
START
OCT03-E-4.qxp 04.3.26 1:51 PM Page 91