
Specifications
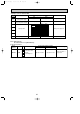


88
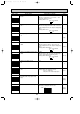
10 FUNCTION SETTING
A
H
B
CJ
D
1
E
G
F
234
PAR-20MAA
ON/OFF
CENTRALLY CONTROLLED
ERROR CODE
CLOCK
ON OFF
˚C
CHECK
CHECK MODE
FILTER
TEST RUN
FUNCTION
˚C
1Hr.
NOT AVAILABLE
STAND BY
DEFROST
FILTER
CHECK TEST
TEMP.
TIMER SET
F
E
G
CD
A
B
1
2
3
4
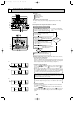
Wired type
1 Mode number
2 Setting number
3 Refrigerant address
4 Unit number
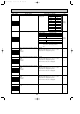
Changing the power voltage setting
• Be sure to change the power voltage setting depending on the voltage
used.
3 Setting the unit number
Press D (CLOCK ON OFF) and [--] will start to flash in the unit number
(4) display (see diagram 3).
Use the C (TIMER SET) button to set the unit number to 00
(see diagram 3). Press to increase the value or to decrease it.
Unit number 00 = the function setting selection for the entire refrigerant
system.
00 is the typical setting. When operating in a group configuration, use
the correlating refrigerant address (see the technical manual for details
on setting the refrigerant address for a group). The refrigerant address-
es must be set in order when performing the following operation.
If the unit stops two seconds after the FUNCTION display starts to flash
or [88] starts to flash in the room temperature display, a transmission
problem may have occurred. Check to see if there is some source of
transmission interference (noise) nearby.
If you make a mistake during any point of this procedure, you can quit
the function setting mode by pressing 8 once and then return to step
1.
*
FUNCTION
FUNCTION
1
2
3
FUNCTION
FUNCTION
3
4
[Operating instructions] (entering settings with a wired remote controller)
1 Go to the function setting mode.
Switch OFF the remote controller.
Press the A FILTER and B TEST RUN buttons simultaneously and hold
them for at least 2 seconds. FUNCTION will start to flash. The refrigerant
address display will start to flash momentarily (see diagram 1).
2 Setting the refrigerant address
Use the C (TIMER SET) button to set the refrigerant address
(3) to 00 (see diagram 2). Press to increase the value or to
decrease it.
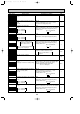
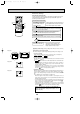
Selecting functions using the wired remote controller
1 Check the function selection setting.
2 Switch to function setting mode. w
(Press A and B at the same time
with the remote controller stopped.)
w For modes 15 and higher,
press J and B at the same
time.
3 Specify refrigerant address 00 (outdoor unit)
4 Specify unit No. 00. (indoor unit)
(Use C and D.)
5 Enter the setting.
(Press E.)
(Specified indoor unit:
BLOW operation)
Change refrigerant
address unit No.
6
Select mode No 02
(room temperature detection position).
7
Select setting No. 03 (remote controller fixed).
(Use
F
and
G
.)
9
8 Enter the setting.
(Press E.)
Finished
10
Function selection end screen
(Press A and B at the same time.)
YES
YES
NO
NO
Example:
Selecting room temperature
detection position
OCT03-E-3.qxp 04.3.26 1:50 PM Page 88