
Specifications


34
4
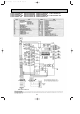
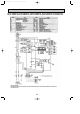
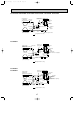
REFRIGERANT SYSTEM DIAGRAM
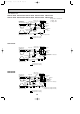
Measurement item
COOL: 1.8 ~ 2.4 HEAT: 1.8 ~ 2.6
0.33 ~ 0.55
72 ~ 105
-2 ~ 14
COOL: 27: HEAT: 20:
COOL: 8 ~ 12
HEAT: 40 ~ 50
COOL: 35 HEAT: 7
COOL: 40 ~ 50 HEAT: 0 ~ 16
Measurement method, remarks
Connect the pressure gauge to the high-pressure check valve.
Connect the pressure gauge to the low-pressure check valve.
Measure with piping surface thermometer.
Measure with piping surface thermometer.
Can be displayed on remote controller.
Measure with piping surface thermometer.
Measure with piping surface thermometer.
High pressure (MPa)
Low pressure (MPa)
Discharge pipe temperature (:)
Suction pipe temperature (:)
Indoor intake temperature (:)
Indoor outlet temperature (:)
Outdoor intake temperature (:)
Outdoor outlet temperature (:)
Pressure/temperature near JIS
standard operating conditions
A
B
C
D
E
F
G
H
When outdoor units (P1 to P6) and indoor units (P1 to P6) are combined in a proportion of 1:1 ("Hi" notch on indoor unit)
Gas pipe
Ball valve
4-way valve
Outdoor heat exchanger
63H
(High pressure switch)
63L(Low pressure switch)
Indoor heat exchanger
Accumulator
Liquid pipe
Stop valve
LEV
Drier
Compressor
A
B
C
D
Note 1: When draining the outdoor
unit's refrigerant, you must
attach a new drier amid the
extension piping. Be sure you
have the drier specified for
your model before beginning
the operation. The drier
model used with R22 can't be
used.
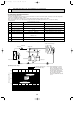
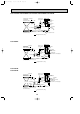
Overload operation
Low-pressure operation
Standard
operation
range
Permissible operation range
Normal operation range
0.2 0.4 0.6 0.8
Intake pressure (MPa)
1.0
Discharge pressure (MPa)
2.0
3.0
3.3
Operation pressure ranges
4-1. Checking operation statuses
Measurement points and items
•The table and diagrams below show the measurement item for each measurement point, and the pressure and temperature
near the JIS standard operating conditions.
•Measure the temperature and pressure of each part by following the descriptions in the table.
•Measurement time: Be sure to wait until the refrigerant circuit has stabilized (30 minutes to 1 hour) before taking
measurements.
OCT03-E-2.qxp 04.3.26 1:48 PM Page 34