
Specifications


4
ON/OFF
–
TIMER SETSET TEMP.
REMOTE CONTROLLER
MODE TIMER ON/OFF CLOCK/TIMER FAN SPEED AIR DISCHARGE FILTER
AIR SWEEP CHECK
TEST RUN
STAND BY
DEFROST
DRY COOL
AUTO FAN
HEAT
CENTRALLY CONTROLLED
˚F
SWING
FAN
SPEED
AUTO
RETURN
NOT AVAILABLE
˚F
CHECK MODE
FILTER
TIMER
TEST RUN
TIMER OFF CLOCK AUTO AUTO
CHECK SET TEMP. START STOP
ABC
1
2
ON/OFF
–
TIMER SETSET TEMP.
REMOTE CONTROLLER
MODE TIMER ON/OFF CLOCK/TIMER FAN SPEED AIR DISCHARGE FILTER
AIR SWEEP CHECK
TEST RUN
STAND BY
DEFROST
DRY COOL
AUTO FAN
HEAT
CENTRALLY CONTROLLED
˚F
SWING
FAN
SPEED
AUTO
RETURN
NOT AVAILABLE
˚F
CHECK MODE
FILTER
TIMER
TEST RUN
TIMER OFF CLOCK AUTO AUTO
CHECK SET TEMP. START STOP
B
1
2
A
ON/OFF
–
TIMER SETSET TEMP.
REMOTE CONTROLLER
MODE TIMER ON/OFF CLOCK/TIMER FAN SPEED AIR DISCHARGE FILTER
AIR SWEEP CHECK
TEST RUN
STAND BY
DEFROST
DRY COOL
AUTO FAN
HEAT
CENTRALLY CONTROLLED
˚F
SWING
FAN
SPEED
AUTO
RETURN
NOT AVAILABLE
˚F
CHECK MODE
FILTER
TIMER
TEST RUN
TIMER OFF CLOCK AUTO AUTO
CHECK SET TEMP. START STOP
F
12
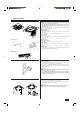
2. Operation
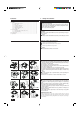
2.5. Adjusting airflow direction
The vertical air vane helps select the vertical direction of the airflow. (Except PC24,
30, 36, 42EK)
1 Press AIR DISCHARGE button to select the vertical airflow direction.
• Each time you press the button, the option changes are displayed on the remote
controller, as shown below.
A (swing) → B → C → D → E → A
• In cooling/drying mode with the fan speed set to LOW, every press on the button
will change the direction in the order of A, B, D, A. (C can not be set)
• If D or E is set, the angle will automatically revert to B after one hour of opera-
tion.
(Do not use D and E too often in cooling/drying mode with the fan speed set to
LOW, or condensation or dripping can occur.)
F “AUTO RETURN” should be displayed.
• When the angle setting is C in cooling mode, switching the fan speed from HIGH
to LOW will cause the angle to revert to B automatically.
• The airflow direction can not be set with UP/DOWN while the SWING setting is
being used.
AIR SWEEP (PCH24, 30, 36, 42EK and PC24, 30, 36, 42EK only)
2 Press the AIR SWEEP button to turn the jumbo swing louver on or off.
• Remote control display reading when air sweep is in operation.
• The arrow indicators are alternately displayed when the air sweep is in operation,
however they are not displayed when the air sweep is not in operation.
• The airflow vane of the PCH series and the guide vane of the PKH and PK series
can be changed manually.
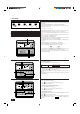
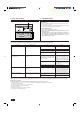
2.6. Using the timer
1) Set the current time
1 Press clock/timer button to display the “CLOCK” B.
Remote
CLOCK
→
AUTO
START
→
AUTO
STOP
→ No Display
controller display A
2 Each time you press
TIMER SET
button, the time increases in increments of one minute.
Each time you press
TIMER SET
button, the time decreases in increments of one minute.
• Press and hold the button to rapidly change the time.
• The time changes in increments of one minute → ten minutes → in units of hour; in
this order.
• Approximately ten seconds after pressing the button, the display on the remote
controller will turn off.
2) Set the time to start the unit as follows
1 Press clock/timer button to display B
AUTO
START
.
2 Press
TIMER SET
button to set the time that you want the unit to start.
The start time is displayed at A.
3) Set the time to stop the unit as follows
1 Press clock/timer button to display C
AUTO
STOP
.
2 Press
TIMER SET
button to set the time that you want the unit to stop.
The stop time is displayed at A.
4) Changing the set times
1 Press clock/timer button to display the time (CURRENT, START, STOP) you want
to change.
2 Press
TIMER SET
button to set the desired time.
• When change is made to either one of a pair, e.g., AUTO START or AUTO STOP,
set the time you need not to change to
. This display is available follow-
ing 23:50.
↑
ABCDE
ABCDE
PL(H) Swing 30° 45° 55° 70°
PK(H)* Swing 10° 30° 60° 70°
PK12FK – 10° 30° 60° 70°
PCH –
100% Horizontal 60% Downward 80% Downward 100%Downward
* Except PK12FK