
Branch Box Installation Manual

8
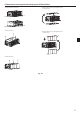
7. Installing refrigerant piping
9
9
8
7
G
3456
L
J
H
F
10 to 20
30 to 50
Caution:
Tighten the fl are nut with a torque wrench in the specifi ed method.
Overtightening will cause the fl are nut to crack and it will cause refrigerant
leakage over a period of time.
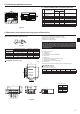
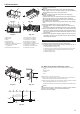
C
Apply refrigeration oil to the entire (Fig. 7-2) surface of the fl ared seat.
D
Basically use fl ared nuts fi tted to the body (commercially available fl ared nuts
may crack).
Note:
A special fl are nut (optional or attached to the indoor unit) is needed to
some indoor units.
Please refer to the installation manual of outdoor unit and indoor unit for
details.
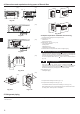
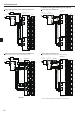
F
Band
9
G
Pipe covers
3456
H
Tighten
J
Refrigerant piping
L
Thermal insulation for refrigerant piping
► Use the following procedures for indoor connection part which indoor
unit is not connected. (Fig. 7-4)
(1) In order to prevent refrigerant leaks, make sure that the fl are nuts are tightened
according to the specifi ed torques* in Table 3.
* Refrigerant may also leak if the fl are nuts are tightened more than the speci-
fi ed torques.
(2) In order to prevent condensation, install the pipe covers
7
8
against the unit
and fasten them with the supplied bands
9
.
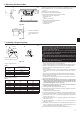
Table 3
Diameters of branch box openings for
connecting indoor units (mm)
Tightening torque
(N•m)
ø6.35 13 ± 2
ø9.52 30 ± 2
ø12.7 50 ± 2
► Refrigerant charge:
Refer to the installation manual of the outdoor unit.
Use only R410A refrigerant (use of other refrigerants may cause troubles).
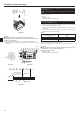
Caution:
To avoid excessive strain on the branch box, support the piping with one or
more support(s) 1.5 m or less from the branch box.
Refer to Fig. 7-5 as an example.
J
Refrigerant piping
L
Thermal insulation for refrigerant piping
(mm)
Fig. 7-4
Fig. 7-5
1.5 m or less
Support
Pipe cover
Fig. 7-3
C
D
3
6
4
5
Fig. 7-2