
HG-A Series Hail Guard Installation Manual
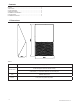
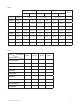


Table Of Contents

HG-A1, -A2, -A3 Rear Guard
Step 1. Loosening the screws in the top panel. Slide the top
of the hail guard under the screw head and re-tighten enough
to support the hail guards as you align the holes with the
holes in the outdoor unit.
Step 2. Loosely tighten the hail guard with the screws
provide.
Step 3. Check the alignment, and fully tighten the screws.
HG-A1, -A2, -A3 Side Guard
Step 1. Align side hail guard holes with existing screw holes
on the outdoor unit and secure with screws provided.
SCALE 0.125
Step 1
Step 1
6
© 2016 Mitsubishi Electric US, Inc.