
User`s manual


Table Of Contents
- SAFETY PRECAUTIONS
- CONDITIONS OF USE FOR THE PRODUCT
- REVISIONS
- INTRODUCTION
- CONTENTS
- ABOUT MANUALS
- HOW TO USE THIS MANUAL
- ABOUT THE GENERIC TERMS AND ABBREVIATIONS
- PACKING LIST
- 1. OVERVIEW
- 2. SYSTEM CONFIGURATION
- 3. FUNCTION LIST
- 4. INSTALLATION AND UNINSTALLATION
- 5. SCREEN MAKEUP AND BASIC OPERATIONS
- 6. PROJECT CREATION
- 7. SYSTEM CHECKING FROM PERIPHERAL DEVICE
- 8. DATA SETTING
- 9. WRITING TO/READING OF/VERIFICATION OF POSITIONING MODULE DATA
- 10. POSITIONING DEBUGGING
- 11. USEFUL FUNCTIONS
- APPENDIX
- Appendix 1 Read from Module/Write to Module Reference Processing Times
- Appendix 2 Restrictions Depending on Function Version of QD75
- Appendix 3 Functions Added to/Changed from the Previous Versions
- Appendix 4 Uninstalling the License Key FD
- Appendix 5 Parameter Names Shown in GX Configurator-QP Screens and Manuals
- INDEX
4 - 6 4 - 6
MELSOFT
4. INSTALLATION AND UNINSTALLATION
(From the preceding page)
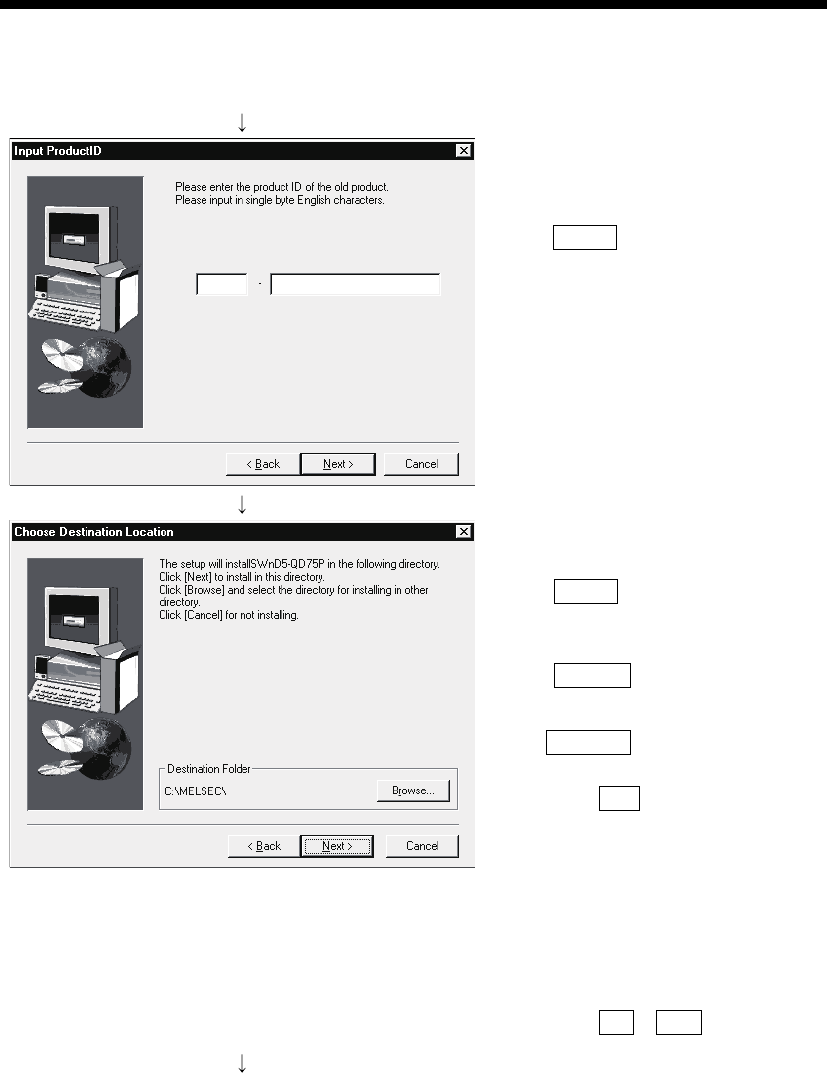
10) When an update-only product is used for
updating, the screen shown on the left appears.
Enter the product ID of the old product and click
the Next> button.
The product ID is given in the "Software
Registration Card" or "License agreement"
packed with the product.
The screen shown on the left does not appear
when the product is installed anew.
11) Specify the installation destination folder.
After specifying the destination folder, click
the Next> button.
It defaults to "C:\MELSEC\".
To change the destination folder, click
the Browse button and specify a new drive and
folder.
REMARK
If the following dialog box appears, click
the OK button to end the installation.
Then, reinstall GX Configurator-QP
compatible with the operating system.
For the versions of GX Configurator-QP
compatible with each operating system, refer
to Appendix 3.
(The following screen may appear behind
another screen. Then, press
the Alt + Tab keys to bring it to the front.)
(To the next page)