
User`s manual


Table Of Contents
- SAFETY PRECAUTIONS
- CONDITIONS OF USE FOR THE PRODUCT
- REVISIONS
- INTRODUCTION
- CONTENTS
- ABOUT MANUALS
- HOW TO USE THIS MANUAL
- ABOUT THE GENERIC TERMS AND ABBREVIATIONS
- PACKING LIST
- 1. OVERVIEW
- 2. SYSTEM CONFIGURATION
- 3. FUNCTION LIST
- 4. INSTALLATION AND UNINSTALLATION
- 5. SCREEN MAKEUP AND BASIC OPERATIONS
- 6. PROJECT CREATION
- 7. SYSTEM CHECKING FROM PERIPHERAL DEVICE
- 8. DATA SETTING
- 9. WRITING TO/READING OF/VERIFICATION OF POSITIONING MODULE DATA
- 10. POSITIONING DEBUGGING
- 11. USEFUL FUNCTIONS
- APPENDIX
- Appendix 1 Read from Module/Write to Module Reference Processing Times
- Appendix 2 Restrictions Depending on Function Version of QD75
- Appendix 3 Functions Added to/Changed from the Previous Versions
- Appendix 4 Uninstalling the License Key FD
- Appendix 5 Parameter Names Shown in GX Configurator-QP Screens and Manuals
- INDEX
10 - 40 10 - 40
MELSOFT
10. POSITIONING DEBUGGING
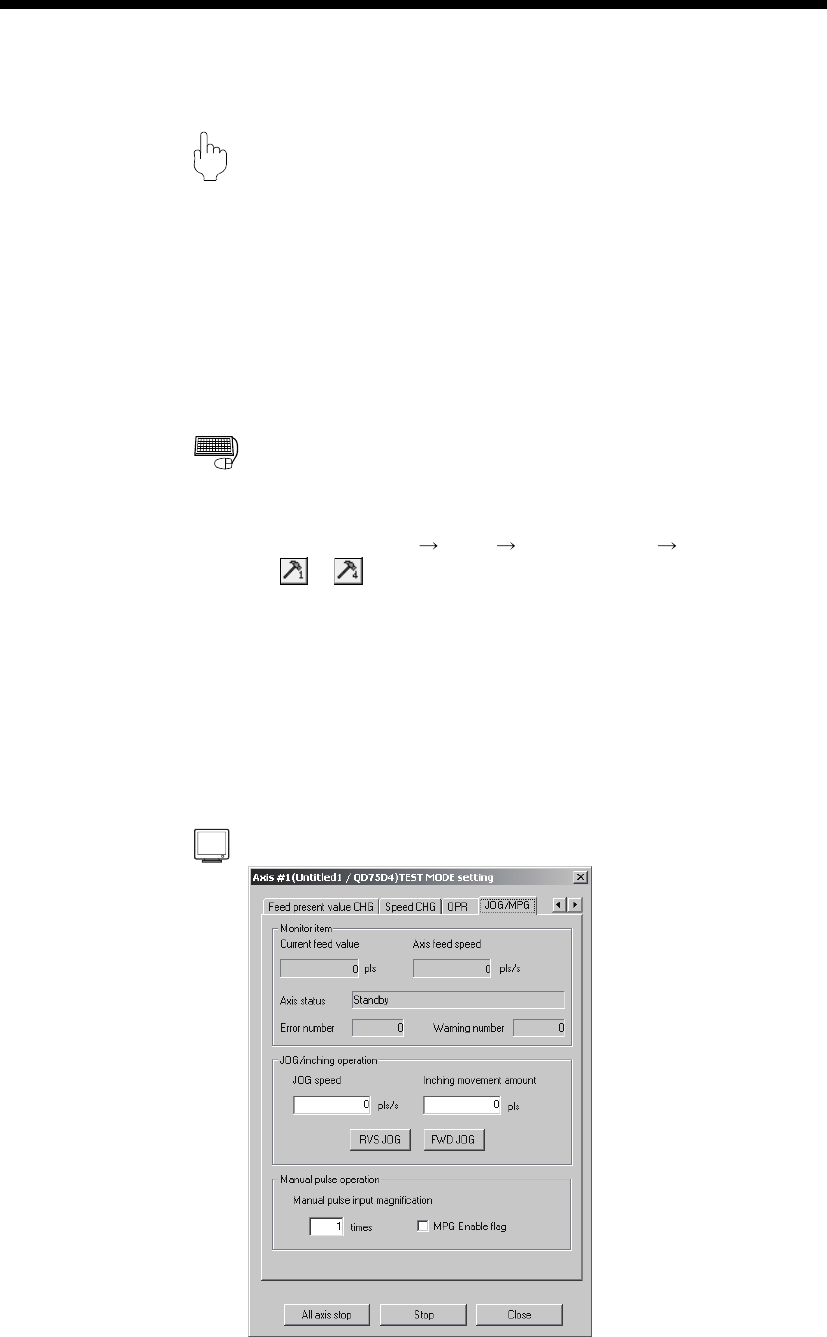
10.4.5 JOG/MPG operation test
PURPOS
E
When debugging positioning control by JOG or MPG operation, you can conduct
the following tests.
• Forward/reverse direction checking
• Checking of the ON/OFF of the external input signals such as upper/lower limit
switch, zero phase and dog signals
• Speed and acceleration/deceleration operation tests
• Measurement of backlash compensation by forward or reverse operation
• Measurement of accurate addresses and travel distances
BASIC OPERATIO
N
1. Place the QD75/LD75/LD77 in the test mode in accordance with Section 10.4
(1).
2. Click the [Online]
[Test] [Operation test] [Operation test #1 to #4] menu
(
to
).
3. Click the <<JOG/MPG>> tab in the TEST MODE setting dialog box.
4. When performing JOG operation, set "1" or more for JOG velocity and "0" for
Inching value, and press the "FWD JOG" or "RVS JOG" button.
5. When performing inching operation, set the inching travel value and press the
"FWD JOG" or "RVS JOG" button.
6. When performing MPG operation, set the MPG input magnification, click
unchecked MPG Enable flag, and use the manual pulse generator.
7. To exit, click the "Close" button.
DISPLAY/SETTING SCREE
N