
Specifications


217
(1) Selection of installation location
Following locations should be avoided:
(a) Where exposed to direct sunlight
(b) Near the heat source
(c) Highly humid area or where splashed with water
(d) Uneven installation surface
(2) Selection of installation location
Exposed installation
(a) Remove the remote controller case.
● Insert finger nails between the upper (white) and
lower (brown) cases and ply them to open.
2.5.2 Installation of the remote controller (Optional parts)
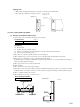
(b) Remote controller cords can be taken out upward only as
shown below.
● Cut the remote controller lower case off at the top and
thin section with a nipper, knife or other and remove
burrs from the cut with a file or other.
(c) Secure the remote controller lower case on the wall with 2
pieces of wood-screws.
(d) Connect the remote controller cords with the terminal block.
Make sure to align the terminal numbers on the indoor unit
and the remote controller. Polarities are specified on the
terminal block so that the unit will not be operated if the
cords are connected improperly.
Terminals: (X) red wire, (Y) white wire, (Z) black wire
Bottom
Lower case
Top
Lower case (brown)
Upper case (white)
(d) Drain piping
The drain piping can be directed to the floor or rear sides as follows.
(a) Connect a drain piping to the drain outlet and fix it by use of tigghening band.
(b) Indoor side drain piping must be thermally insulated.
(c) After finishing the drain piping, check the drainage by pouring some water in the drain pan.
Decrine
Trap
Up-and-down bend
Bad
Bad
Top
(Cord take-out direction)