
Specifications


213
d) Level the unit using the level adjusting screw. Installation will be complrted after attaching side and front panel.
e) Exceute fixation following the directions described below.
(c) Installation of unit
1) Floor standing installation
a) Position of mounting bracket fixing bolts Drill holes by referring to figures below.
Note (1) Be sure to use a bolt of the length for wall mouning.
b) The methed of drilling the wall is as follows.
c) Remove the front and side panels.
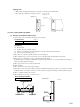
● When fixed on the floor
● When fixed on the wall
When fixed on the wall
30mm
Wall
Hole for piping
& wiring on floor
When fixed on the floor
2 places
4 places
Hole for piping &
wiring on wall
Bolt for wall mounting
Wall
Indoor
Outdoor
Sleeve
Ø70~86 mm
Sealing plate
Wall
Sleeve
Case front panel
Case side panel
Case side panel
Case front panel
Case front panel
Side panel
Top panel
Frame
Frame side panel
Mounting platc
(Accessories)
Tighten the bolt for floor
fixation using a flat washer
and double nut.
Tighten the bolt for wall
fixation using a flat washer
and double nut.