
Specifications


176
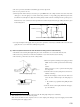
(f) Panel installation (Panel installing bolts are attached to the panel.)
1 Check that the indoor unit’s height and opening dimensions in the ceiling are correct.
2 Check that level is ensured.
3 Open the suction grill.
4 Screw in two of the four suspension bolts attached to the panel, on the piping side and at its opposite angle, by a little less
than 5 mm (¡ marks).
5 Hook the panel into two of the suspension bolts to pre-install it.
With pre-installation is performed, first hook the panel to bolt A, then to bolt B while rotating the panel.
(Take care so that the unit does not rotate during pre-installation.)
6 Tighten the pre-installed suspension bolts and two remaining suspension bolts.
7 Attach the louver motor connector (white, 4P) and the limit switch connector (white, 2P).
8 Use the provided screws to tighten chains to the panel. Chain installing screws is contained in the same bag as suspension
bolts.
9 Close the suction grill. Now installation is complete.
0 When the louver motor does not operate with the remote control, check connections of the connectors, turn off the power
for more than 10 seconds and reset.
7
Connector
A
Chain
3 8
3 9
Panel installation position
4 5 6
6
7
Rotation
direction
Control box
B
Chain
4 5 6
6
Piping