
Specifications


174
d) Level the unit using a hose filled with water. If the unit is out of level, water leaks or malfunctioning of the floating
switch may occur.
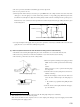
Indoor unit
PVC hose
Supply water
(d) Drain piping
1) Drain piping should always be in a downhill grade (1/50-1/100) and avoid riding across an elevation or making traps.
● Good piping ● Improper piping
1.5 m ~ 2 m
Suspension
bolts
Heat
insulation
A downhill grade
of 1/100 or more
Air vent
Avoid riding
across an elevation
Keep free from traps
Do not pipe under water.
2) When connecting the drain pipe to the unit, pay suffcient attention not to apply excess force to the piping on the unit side.
Also, fix the piping at a point as close as possible to the unit.
3) For drain pipe, use hard PVC ganeral purpose pipe VP-25 (I.D.1'')
which can be purchased locally. When connecting, insert a PVC
pipe end securely into the drain socket before tightening securly
using the attached drain hose and clamp. Adhesive must not be
used connection of the drain socket and drain hose (accessory).
Drain socket
Level difference part
Drain hose
Joint for VP-25
(local procurement)
Pipe cover (small)[insulation]
(accessory)
Drain socket
Indoor
unit
Clamp
(accessory)
Drain hose
(accessory)
Adhesion
VP-25
(local procurement)
Pipe cover [insulation]
(local procurement)
Pipe cover (large)[insulation]
(accessory
4) When constructing drain piping for several units, position the common pipe about 100mm below the drain outlet of each
unit as shown in the sketch below. Use VP-30 or thicker pipe for this pupose.
Secure the elevation as high as possible
(approx. 100 mm)
VP30
A downhill grade of
1/100 or more
e) After ensuring the above, secure the unit.
2) When embedded into ceiling
a) Install the unit following steps b) and c) of the above part 1).
b) When installing on a conventional ceiling, cut an installation opening (740 mm X 600 mm) in the ceiling.
c) Check the installation height and level, and after that, secure the unit.