
Specifications


170
Drainage test
When using the standard drain port, execute a drainage test after completion of
electric work.
1 During the test run, make sure that drain flows properly through the piping
and that no water leaks from connections.
2 Be sure to conduct this test even when the unit is installed in the heating
season.
3 In case of a new building, conduct the test before it is furnished with the
ceiling.
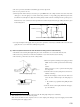
1) Inject about 1,000cc by using a feed water pump from the grommet on the drain pump side.
2) At the drain port (transparent portion), check if drainage is performed.
3) After completion of the drain test, completely perform heat insulation fot the drain pipe up to the indoor unit.
Forced drain pump operation
1 Turn on dip switch (SW5-3) on the PCB of the indoor unit. The drain pump operates continuously.
2 After the test, be sure to turn off the dip switch.
(If the electrical work has not been completed, connect a convex coupling to the drain pipe to provide a supply port and confirm the
draining status of the piping system.)
(g) Fixing of Panel ( The panel fixing bolts are attached on the panel. )
Note (1) Care should be exercised in handling the supply air port on the panel because it is easily depressed by finger nail.
1) Check with the accessory level gauges that the indoor unit height and the size of ceiling hole are correct.
Notes (1) Remove the level gauge from the indoor unit befroe fixing the panel.
(2) Remove the Air inlet panel from the panel proper.
Procedure for dismounting the air inlet panel
Note (1) If the connector remains connected, drain water is discharged from the standard pipe connecting port, leading to water leakage.
Air inlet panel
Panel proper
Remove
Pin (B) Pin (A)
Panel outer frame
Panel inner frame
Clear flexible tubing (optional)
Hard vinyl chloride piping.
General piping VP-20
Heat
insulation
Rubber plug
Remove
Control boxNatural drain port
CNR (Blue·2P)
Insert the tip of the supply water pump approximately
50 mm in a downward direction.
Piping penetration cover