
Specifications


831
FDC-HKX
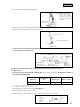
● Hook the chain of panel outer panel on the holder.
● Tighten 3 screw in the step 1 till the panel outer frame contacts closely with the ceiling material.
● Secure the canvas duct and the panel outer frame with screws.
5 Remove the panel inner frame and install in the reverse order of removal.
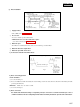
6 Cautions for duct installation work
Calculate the draft and external static pressure and select the length, shape and blowout.
◆ Supply air duct
● 1-spot, 2-spot, 3-spot and 4-spot with ⭋200 type duct are the standard specifications. Determine the number of
spots based on following table.
Notes (1) Shield the central supply air port for 2-spot.
(2) Shield the supply air port around the center for 3-spot.
● Limit the difference in length between spots at less than 2:1.
● Reduce the length of duct as much as possible.
● Reduce the number of bends as much as possible. (Corner R should be as larger as possible.)
1-spot
FDR22 type FDR71, 90 type FDR112, 140 type
FDR28, 45, 56
type
2-spot 2 ~ 3-spot
(1)
3 ~ 4-spot
(1)
Ceiling material
When hooking the chain.
make sure to avoid slack-
ness on it by pushing
hard the panel outer
frame against the ceiling
material.
Note (1)
Canvas duct
Panel outer frame
1 Round head machine screw
Convas duct
(Optional
parts)
Indoor unit
Ceiling surface
Supply air port
(to be purchased locally)
Supply air duct
(to be purchased locally)
Heat
insulation
Return air
port panel
(Canvas panel)
Return air
port panel
Silent panel
Bad exampleBad example Good example