
Operation Manual


EN-14
Preparation
Preparation for projection
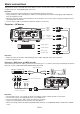
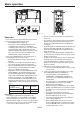
1. Attach the provided power cord to the projector.
2. Plug the power cord in the wall outlet.
3. Remove the lens cap.
Warning:
t %POPUMPPLJOUPUIFMFOTEJSFDUMZXIFOUIFQSPKFDUPS
is on.
t 5IFMFOTDBQJTGPSQSPUFDUJOHUIFMFOT*GZPVMFBWF
the lens cap on the lens with the projector turned
on, it may be deformed because of heat build-
up. Remove the lens cap when you turn on the
projector.
t 0OFPGQPXFSDPSETGPSUIF64&VSPQF
U.K., Australia, and South Korea is provided
appropriately.
t 5IJTQSPKFDUPSVTFTUIFQPXFSQMVHPGUISFFQJO
grounding type. Do not remove the grounding pin
from the power plug. If the power plug doesn’t fit
your wall outlet, ask an electrician to change the
wall outlet.
t *ODBTFUIBUUIFQPXFSDPSEGPSUIF64JTQSPWJEFE
with this projector, never connect this cord to any
outlet or power supply using other voltages or
frequencies than rated. If you want to use a power
supply using other voltage than rated, prepare an
appropriate power cord separately.
t 6TF7"$)[UPQSFWFOUmSFPS
electric shock.
t %POPUQMBDFBOZPCKFDUTPOUIFQPXFSDPSEPS
do not place the projector near heat sources to
prevent damage to the power cord. If the power
cord should be damaged, contact your dealer for
replacement because it may cause fire or electric
shock.
t %POPUNPEJGZPSBMUFSUIFQPXFSDPSE*GUIFQPXFS
cord is modified or altered, it may cause fire or
electric shock.
Caution:
t 1MVHJOUIFQPXFSDPSEmSNMZ8IFOVOQMVHHJOH
hold and pull the power plug, not the power cord.
t %POPUQMVHJOPSPVUUIFQPXFSDPSEXJUIZPVS
hand wet. It may cause electric shock.
t 8IFOZPVNPWFUIFQSPKFDUPSUVSOPGGUIFQPXFS
unplug the power cord from the wall outlet, and
then remove the connected cords. Otherwise, the
power cord may be damaged, resulting in fire or
electric shock.
t *GEVTUPSNFUBMMJDTVCTUBODFJTPOPSBSPVOEUIF
pins of the power plug, unplug the power cord and
clean it using a dry cloth. If you continue to use the
projector without cleaning, it may result in fire or
electric shock. Clean the power plug periodically at
least once a year.
t #FTVSFUPVOQMVHUIFQPXFSDPSEGSPNUIFXBMM
outlet if the projector will not be used for a long
period of time. Otherwise, it may cause fire.
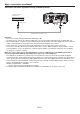
Adjusting the position of the
projected image
To adjust the position of the projected image on the
screen, use the LENS SHIFT dial.
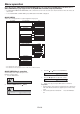
1. Rotate the LENS SHIFT dial inside the top cover of
the projector to adjust the image position.
t 3PUBUJOHUIFEJBMDMPDLXJTFPSDPVOUFSDMPDLXJTF
for a ceiling-mount projector) moves the image
up.
t 3PUBUJOHUIFEJBMDPVOUFSDMPDLXJTFPSDMPDLXJTF
for a ceiling-mount projector) moves the image
down.
t #FDBSFGVMOPUUPCFDBVHIUJOUIFPQFOJOHJOUIF
lens while the lens is moving.
t 8IJMFUIFMFOTTIJGUJTXPSLJOHUIFTDSFFONBZ
flicker.
t 1SPKFDUFEJNBHFTNBZCFDPNFEJTUPSUFEIBWF
decreased resolution, or have shadows at their
corners if they are positioned close to the top or
bottom.
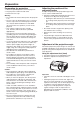
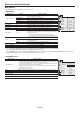
Adjustment of the projection angle
For the best projection, project images on a flat screen
installed at 90 degrees to the floor. If necessary, tilt the
projector using the two adjustment feet on the bottom
of the projector.
Using the adjustment feet (front)
1. Tilt up the projector to the appropriate angle.
2. Rotate the adjustment feet (front) for fine
adjustment.
Important:
t *OTUBMMUIFTDSFFOPOBnBUXBMMBUEFHSFFTUPUIF
floor.
t 4MBOUJOHUIFQSPKFDUPSNPSFUIBO¡SJHIUBOE
MFGUPS¡GSPOUBOESFBSNBZDBVTFUSPVCMFPS
explosion of the lamp. You can tilt the projector up
to 8 degrees using the adjustment feet only.
t *NBHFTNBZOPUCFQSPKFDUFEJOBTIBQFPGB
regular rectangle or with its aspect ratio 4:3,
depending on the installation conditions of the
projector and the screen.