Dreambox DM 7025 Bedienungsanleitung User Manual Digitaler Satellitenempfänger zum Empfang von freien und verschlüsselten DVB-Programmen mit optionaler digitaler Aufzeichnungsmöglichkeit. Digital satellite receiver for free and encrypted Digital Video Broadcasting (DVB) with optional digital recording capability.
User Manual Dreambox DM 7025 english Table of contents 1. Before initial operation of the receiver 1.1 Safety instructions ......................................................................- 5 1.2 Packaging contents ....................................................................- 8 1.3 Views ..........................................................................................- 9 1.3.1 Explanation front panel ...................................................- 10 1.3.
User Manual Dreambox DM 7025 english 6. Edit the channellist 6.1 Add a bouquet ..........................................................................- 29 6.2 Add a service to favourites .......................................................- 30 6.3 Adding multiple services to a bouquet......................................- 31 6.4 Remove a service from favourites ............................................- 32 6.5 Moving a service to favourites ..................................................
User Manual Dreambox DM 7025 english 11. Service searching 11.1 DVB-S Tuner configuration ....................................................- 62 11.1.1 Single satellite – direct connection ...............................- 63 11.1.2 Two satellites via Toneburst A/B ..................................- 64 11.1.3 Two satellites via DiSEqC A/B......................................- 65 11.1.4 Four satellites via DiSEqC A/B/C/D ..............................- 66 11.1.5 Stab positioner using USALS .............
User Manual Dreambox DM 7025 1. english Before initial operation of the receiver 1.1 Safety instructions Please read the safety instructions completely and carefully, before using the Dreambox. The Manufacturer takes no responsibility for damages as a result of incorrect handling of the Dreambox. - Allow enough space around the Dreambox for sufficient ventilation. - Do not cover the top of the Dreambox and allow enough space to other devices.
User Manual Dreambox DM 7025 english Shut down - In case your Dreambox is in use for a longer period of time disconnect the power plug from the power outlet. - During thunder storm the unit should also be physically disconnected from the power outlet. Additional safety instructions - (Dis-)Connecting to a LNB: Turn the Dreambox off before you connect or disconnect a cable coming from or going to a LNB.
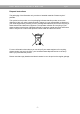
User Manual Dreambox DM 7025 english Disposal instructions The packaging of the Dreambox only consists of reusable materials. Please recycle if possible. This symbol on the product or on its packaging indicates that this product must not be disposed of with your other household waste. Instead, it is your responsibility to dispose of your waste equipment by handing it over to a designated collection point for the recycling of waste electrical and electronic equipment.
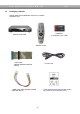
User Manual Dreambox DM 7025 1.2 english Packaging contents Please check the completeness of the box’s contents. Included in box: 2 Batteries (1,5V Mignon / AA / LR6) Dreambox DM 7025 Remote control 1 IDE-Cable (already installed inside the device) 1 Power cord 1 HDD power cable (already installed inside the device) 1 User manual (most recent version online: http://www.dream-multimedia-tv.
User Manual Dreambox DM 7025 1.
User Manual Dreambox DM 7025 english 1.3.1 Explanation Front Panel CI-Slot Plug in here any CI- Module of your choice. Compact Flash Slot The Compact Flash Slot is meant to hold a Compact Flash Module. The Compact Flash Module can be plugged in during regular operation. Smartcard reader Insert your Dreamcrypt Smartcard with the golden chip facing down and forward into one of the two Smartcard reader slots. Dreamcrypt is a registered trademark of Dream-Multimedia.
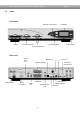
User Manual Dreambox DM 7025 english 1.3.2 Explanation rear panel Mains switch The main power switch completely cuts power from your Dreambox. Mains connection Plug the power cable into the main power socket. You must not connect the power plug to anything other than a socket that supplies 110V/60Hz or 230V/50Hz. Analog audio out (RCA) Connect your Dreambox with a RCA/Cinch cable to your HiFi-Amplifier (e.g. AUX In or Tape In ports).
User Manual Dreambox DM 7025 english Modem port (optional) You can optionally connect your Dreambox to your ISP via the Modem Socket using a phone line. The modem can be ordered from Dream Multimedia. Digital audio out (Toslink) You can connect your Dreambox with an optical (Toslink) cable to your HiFi-Amplifier or DSP. The AC3 signal is also available at this port in case the selected channel transmits Dolby Digital signals. Mini DIN Port The Mini DIN port is an expansion port.
User Manual Dreambox DM 7025 1.
User Manual Dreambox DM 7025 english Important notes about operation All functions of the Dreambox can be controlled via OSD-Menu (On-Screen-Display). This makes the handling of the Dreambox very easy for you. All options are indicated by four colored dots or beams (red, green, yellow, blue) in the OSD-Menu and can be started with the Option-Buttons on the Remote Control. Depending on the chosen Menu, these options do vary. The Options-Buttons of your remote control have multiple functions.
User Manual Dreambox DM 7025 english Explanation remote control buttons SHIFT / SETUP-Button The SHIFT/ SETUP-Button is used to preprogram the remote control to operate a TV. See chapter 14. TV-Mode setup. Power-Button The Power-Button switches your Dreambox on and off. See chapter 4.1 Turning your Dreambox on and off. DREAM-Mode-Button The DREAM-Mode-Button switches your remote control into Dreambox control mode. It will shortly light up once your press the button.
User Manual Dreambox DM 7025 english Mute-Button Pressing the MUTE-Button mutes the Volume. A crossed speaker symbol will appear on the TV screen. Pressing it again or pressing one of the Volume +/- Buttons brings back the audio. EXIT-Button You can leave all menus and service lists by pressing the EXIT-Button. Volume +/- Buttons The Volume +/- Buttons control the volume of the audio. Pressing + will make turn it up and pressing - will turn it down.
User Manual Dreambox DM 7025 english MENU-Button If you are in TV- or RADIO-Mode, pressing this button will bring up the OSD main menu. The OSD main menu has the following options: You can switch to the needed option by pressing the Navigation-Buttons up or down. If you are in the service list, pressing the MENU-Button brings up the service menu. The shown options may vary depending on the service list you selected.
User Manual Dreambox DM 7025 english TV-Button (PVR-Mode) Pressing the TV-Button activates the TV-Mode. In PVR-Mode this button is mapped with the stop function as indicated by the small square underneath it. HELP-Button Pressing the HELP-Button activates the Help menu. RADIO-Button (PVR-Mode) Pressing the RADIO-Button activates the RADIO-Mode. TEXT–Button The TEXT-Button activates the Teletext.
User Manual Dreambox DM 7025 2. Installation 2.1 Turning the device on english - Place the batteries inside the battery compartment of the remote control keeping in mind the right polarity. - Before using the Dreambox, please read the safety instructions (See chapter 1.1 Safety instructions) - Connect the LNB or antenna with a coaxial cable to LNB1/2 in or Antenna in at your Dreambox. See chapter 1.3.2 Explanation rear panel.
User Manual Dreambox DM 7025 3. Start wizard 3.1 Language selection english Select your desired and language with the Navigation-Buttons up and down. Press the OKButton to activate. The start wizard takes you through the basic setup of your Dreambox. Press the OK-Button on your remote control to get to the next step. You will be asked if you want to set the basic settings for your Dreambox now or if you want to quit the start wizard.
User Manual Dreambox DM 7025 3.2 english Tuner setup Detailed information about the tuner setup can be found in chapter 11.1 DVB-S Tuner configuration 3.3 Service scan Detailed information about the service scan can be found in chapter 11.
User Manual Dreambox DM 7025 4. Basic operation 4.1 Turning your Dreambox on and off english Use the Power-Button to turn your Dreambox on and off. To put your Dreambox into Standby-Mode either press the Power-Button on your remote control or directly on your Dreambox. The current time will be shown in the Dreambox’s LCDisplay. Holding down the Power-Button on your remote control for three seconds will put your Dreambox into the Deep-Standby-Mode.
User Manual Dreambox DM 7025 4.3 english Changing channel using the service list Pressing the Up/Down-Buttons on your remote control activates the service list. Use the Navigation-Buttons up/down to select the desired service and press the OK-Button to change to the selected service. 4.4 Controlling the volume The Volume +/- Buttons control the volume of the audio. Pressing + will make turn it up and pressing will turn it down. Pressing the MUTE-Button mutes the volume.
User Manual Dreambox DM 7025 4.6 english Sub Services The green dot in the Infobar appears if the selected station transmits sub services. Pressing the green Options-Button in TV or Radio mode will reveal the sub services menu. Use the Navigation-Buttons up and down to move to one of the sub services. Press the OK-Button to select. 4.7 TV/Radio switching Pressing the RADIO-Button activates the RADIO-Mode. By pressing the TV- or EXITButton you can quit the RADIO-Mode. 4.
User Manual Dreambox DM 7025 4.9 english Infobar The Infobar appears and disappears by pressing the OK-Button once, if no OSD menu is shown on your screen or when you change channels. The Infobar shows all necessary Information about the selected service. Channel name Signal level/strength Current show Next show Elapsed time Recording status Remaining time Current time Dolby Digital Is highlighted yellow as soon as a show is broadcasted encrypted.
User Manual Dreambox DM 7025 5. english Electronic Program Guide - EPG By pressing the INFO-Button in TV-Mode you are supplied with detailed information about the current show and by pressing the Right-Button afterwards about the next show. Pressing the yellow Options-Button activates the “Channel-EPG” (See chapter 5.1) and pressing the blue Options-Button activates the “Multi-EPG“ (See chapter 5.2). The Dreambox automatically searches for similar broadcasts in the background.
User Manual Dreambox DM 7025 5.2 english Multi-EPG Use the blue and yellow Options-Buttons to switch between the now, next and more views. Pressing the green Options-Button will give you the possibility to automatically copy the start and end time of the selected show into a recording timer.. If you have set the “Multi bouquets” option to “yes” (see chapter 10.2) a selection of you bouquets will appear. Select the bouquet for which you want the Multi-EPG view.
User Manual Dreambox DM 7025 english 5.2.1 Time/Date Input Press the Menu-Button in the Multi-EPG view. A A window will appear where you can enter a time and date. After you have entered the desired time and date press the OK-Button to activate you selection. The Multi-EPG will be displayed according to you set time and date. As a example we have selected 20:15. All shows starting 20:15 are displayed.
User Manual Dreambox DM 7025 6. Edit the channellist 6.1 Adding a bouquet english Pressing the Up/Down-Buttons on your remote control activates the service list. Press the blue Options-Button to switch to the bouquet view. By pressing the Menu-Button the "Channellist menu" will open up. Navigate to the option "add bouquet". Use the Numeric-Keypad on your remote control to enter the name for the new bouquet. The according letters are printed on button. The Mute-Button deletes a character.
User Manual Dreambox DM 7025 6.2 english Add a service to favourites If you want to add a service to your Favourites-view you can choose from services in the All-, Satellites- and Provider-views. You can switch views by pressing the red, green, yellow and blue Options-Buttons. At this point we only describe the process from the AllBouquet since it is the same for the others. Pressing the Up/Down-Buttons on your remote control activates the service list.
User Manual Dreambox DM 7025 6.3 english Adding multiple services to a bouquet You can select multiple services from the All-view to be added to the currently selected bouquet. Pressing the Up/Down-Buttons on your remote control activates the service list. Use the Bouquet +/- Buttons to switch to the desired bouquet. As an alternative you can press the blue Options-Button and select the desired bouquet. After that select a service and switch to it by pressing the OK-Button.
User Manual Dreambox DM 7025 english Choose the "End bouquet edit" option. All highlighted services will now be added to the bouquet that you selected in the beginning. If you are only using one bouquet, which is the default setting, the selected services will be added to you favourites list. 6.4 Remove a service from favourites Pressing the Up/Down-Buttons on your remote control activates the service list.
User Manual Dreambox DM 7025 6.5 english Moving a service to favourites Pressing the Up/Down-Buttons on your remote control activates the service list. Use the Navigation-Buttons up/down to select the desired service and press the MENU-Button to open the “Channellist menu”. Navigate to the option “enable move mode” and press the OK-Button. Use the Navigation-Buttons up/down to select the service that you want to move and press the OKButton. The service will be highlighted red.
User Manual Dreambox DM 7025 6.6 english Adding a marker to favourites You have the option to add makers within the favourites bouquets. Pressing the Up/Down-Buttons on your remote control activates the service list. Use the Bouquet +/- Buttons to switch to the desired bouquet. As an alternative you can press the blue Options-Button and select the desired bouquet. Select a service. The marker will be added above the selected service. By pressing the Menu-Button the "Channellist menu" will open up.
User Manual Dreambox DM 7025 7. Hard disk operation 7.1 Mounting guidelines english This chapter describes how to mount a hard disk inside your Dreambox DM 7025. Please always adhere to ESD (Electrostatic Discharge) regulations when handling electronic devices. Make sure that you are grounded. Do not open the device in your living room or in any other rooms with carpeting or any other flooring that can carry an electrostatic charge. Remove all connection from the device.
User Manual Dreambox DM 7025 english Parts list 1 Dreambox (including the 11 Phillips screws for the cover and the hard disk cage). The IDE cable and the hard disk power cord a already installed inside the Dreambox DM7025. 1 Phillips screwdriver 1 Hard disk of your choice 4 Hard disk mounting screws Action: Remove these 5 screws on the rear panel. Remove these 2 screws at the right side of the device. Remove these 2 screws at the left side of the device.
User Manual Dreambox DM 7025 Lift the cover on the sides on slide it backwards. Remove the 2 screws from the hard disk cage. Remove the hard disk cage by lifting it upwards.
User Manual Dreambox DM 7025 english Bend the IDE cable as shown in this picture. Now you need the Phillips screwdriver, the hard disk cage, the 4 hard disk mounting screws and your hard disk.
User Manual Dreambox DM 7025 english Attach the hard disk cage to the hard disk. Pay attention to the correct mount of the hard disk in the hard disk cage. Set the jumper of the hard disk to cable select. This information usually is printed on the hard disk.
User Manual Dreambox DM 7025 english Put the hard disk cage back into the Dreambox and connect the hard disk power cord and IDE cable to the hard disk. Please be careful not to lay the power cord too close to the powersupply. Screw the two screws back onto the hard disk cage. Slide the cover from the rear back onto the device.. Watch for the small plastic clips shown in the picture above.
User Manual Dreambox DM 7025 7.2 english Management If no OSD menu is visible on your screen, press the Menu-Button to open the main OSD menu. Navigate to the option “Setup” and press the OK-Button to select. Navigate to the option “System” and press the OKButton. Navigate to the option “Harddisk…” and press the OK-Button. Navigate to the option “Samsung SV8004H (Internal - Master)” and press the OK-Button.
User Manual Dreambox DM 7025 7.3 english Recording 7.3.1 Instant recording Press the red Options-Button. You have four available options: - Add recording (indefinitely) - Add recording (stop after current event) - Add recording (enter recording duration) - Don't record Use the up/down-Buttons to navigate to you desired selection and press the OK-Button to select. A ongoing recording is indicated by a flashing symbol in the Infobar (see chapter 4.9).
User Manual Dreambox DM 7025 english 7.3.3 Recording by timer With the help of a timer you can record shows (if you have a hard disk installed). You are offered two different ways to program a timer, the manual way of via the EPG. If no OSD menu is visible on your screen, press the Menu-Button to open the main OSD menu. Navigate to the option “Timer” and press the OK-Button to select. You see the “Timer Editor“ menu. Pressing the red Options-Button will delete a timer.
User Manual Dreambox DM 7025 english Manual programming Press the green Options-Button to add a new timer. You can choose between two different timer types. "Record" to record the desired show or "Zap" to automatically switch to the service.
User Manual Dreambox DM 7025 english 7.3.4 Timeshift Once you started an instant recording you can fast-forward and rewind while recording as long as you have already recorded at least 1 minute long. Press the yellow Options-Button to pause the screen (video and audio will pause). The recording will continue in the background. Press the yellow Options-Button again to resume watching. This way you won’t have to miss anything ever again if you quickly have to catch a phone call.
User Manual Dreambox DM 7025 english In PVR-Mode the Options-Buttons are mapped as described below: Green Options-Button Blue Options-Button Red Options-Button Yellow Options-Button TV-Button Keep in mind that you have to be in the PVR-Mode to use these options. You can check this by pressing the OK-Button. The Infobar will reveal and should show the depicted control symbols. If they are not shown you simply have to press the VIDEO-Button once again..
User Manual Dreambox DM 7025 7.5 english Delete a recording Press the Video-Button to get to the selection of recordings. Use the Navigation-Buttons up and down to select a recording. Press the Menu-Button. Use the Navigation-Buttons up and down to select “Delete” and press the OK-Button. You will be asked if you want to delete the recording. As a control feature the name of the recording is displayed as well. Choose “Yes” and you will be taken back to the selection of recordings.
User Manual Dreambox DM 7025 8. english Teletext You are in the TV or Radio mode. Press the Text-Button to enter the teletext. Keep in mind that not every station transmits teletext! Teletext - regular navigation: If you are viewing any teletext page you can enter the interactive mode by pressing the OK-Button. Use the Navigation-Buttons to select a text page number and press the OK-Button to call this page. You don’t need to type in a text page number in this mode, but it is still possible.
User Manual Dreambox DM 7025 english You have the following options: Teletext - Selection: Select the "Search" option and press the OK-Button to start searching for teletext information on other services without having to leave the service that you currently are watching. After the search is finished you can use the Navigation-Buttons left and right to select the teletext of another service without having to switch services. Press the OK-Button to select the desired teletext.
User Manual Dreambox DM 7025 9. english Picture-in-Picture mode (PiP) The Dreambox has a so called PiP-Function. With PiP you can display a small TV picture ontop of the main big TV picture. Press the blue Options-Button and select the "Activate Picture in Picture" option. The main TV picture is now additionally displayed as a small PiP in the upper right corner of your screen and the last watched service is displayed in the main big TV picture.
User Manual Dreambox DM 7025 10. Setup 10.1 Language english If no OSD menu is visible on your screen, press the Menu-Button to open the main OSD menu. Navigate to the option “Setup” and press the OK-Button to select. Navigate to the option “System” and press the OKButton. The “System” menu will open up. Navigate to the option “Language…” and press the OK-Button. The “Language” menu will open up. Select your desired and language with the Navigation-Buttons up and down.
User Manual Dreambox DM 7025 10.2 english Customize If no OSD menu is visible on your screen, press the Menu-Button to open the main OSD menu. Navigate to the option “Setup” and press the OK-Button to select. Navigate to the option “System” and press the OKButton. The “System” menu will open up. Navigate to the option “Customize…” and press the OK-Button.
User Manual Dreambox DM 7025 english Recordings always have priority: If this option is set to “Yes” your Dreambox will automatically switch to the service which is supposed to be recorded incase there is a conflict with an existing timer. If you set this option to “No” you will be asked if you want to switch to the service which is supposed to be recorded. Margin before record (minutes): Set the desired forerun in minutes for a recording.
User Manual Dreambox DM 7025 10.3 english Setting the time zone If no OSD menu is visible on your screen, press the Menu-Button to open the main OSD menu. Navigate to the option “Setup” and press the OK-Button to select. Navigate to the option “System” and press the OKButton. The “System” menu will open up. Navigate to the option “Timezone…” and press the OK-Button. The “Time zone” menu will open up. Use the left/right-Buttons to select the desired time zone.
User Manual Dreambox DM 7025 10.4 english A/V Settings If no OSD menu is visible on your screen, press the Menu-Button to open the main OSD menu. Navigate to the option “Setup” and press the OK-Button to select. Navigate to the option “System” and press the OKButton. The “System” menu will open up. Navigate to the option “A/V Settings…” and press the OK-Button.
User Manual Dreambox DM 7025 english Use the Navigation-Buttons left and right to change the values.
User Manual Dreambox DM 7025 10.5 english RF output If no OSD menu is visible on your screen, press the Menu-Button to open the main OSD menu. Navigate to the option “Setup” and press the OK-Button to select. Navigate to the option “System” and press the OKButton. The “System” menu will open up. Navigate to the option “RF output” and press the OKButton. Connect a TV to the UHF-out using a coaxial cable. Start a channel scan on your TV. The UHFModulator is set to channel 36.
User Manual Dreambox DM 7025 10.6 english LCD Setup If no OSD menu is visible on your screen, press the Menu-Button to open the main OSD menu. Navigate to the option “Setup” and press the OK-Button to select. Navigate to the option “System” and press the OKButton. The “System” menu will open up. Navigate to the option “LCD Setup…” and press the OK-Button. Using the Navigation-Buttons left and right you can set the brightness and contrast of the LCD. “Standby” set the brightness value for standby.
User Manual Dreambox DM 7025 10.7 english Network If no OSD menu is visible on your screen, press the Menu-Button to open the main OSD menu. Navigate to the option “Setup” and press the OK-Button to select. Navigate to the option “System” and press the OKButton. The “System” menu will open up. Navigate to the option “Network…” and press the OK-Button.
User Manual Dreambox DM 7025 english Attention: If you are using a DHCP server in your LAN, configure the DHCP server so it does not assign the IP address used by the Dreambox. Otherwise an IP address collision is possible. Refer to the DHCP server’s manual about how to configure a DHCP address pool. Use the Navigation-Buttons and the Numeric-Keypad to change the values. Use DHCP: If enabled your Dreambox will get its IP from a DHCP server. Disable this option to set a static IP address.
User Manual Dreambox DM 7025 10.8 english Common Interface If no OSD menu is visible on your screen, press the Menu-Button to open the main OSD menu. Navigate to the option “Setup” and press the OK-Button to select. Navigate to the option “Common Interface” and press the OK-Button. Reset: This options resets your CI-Module. This function is needed if you are experiencing trouble with one of your encrypted services. Init: This option initializes an inserted Smartcard.
User Manual Dreambox DM 7025 11. Service searching 11.1 DVB-S Tuner configuration english If no OSD menu is visible on your screen, press the Menu-Button to open the main OSD menu. Navigate to the option “Setup” and press the OK-Button to select. Navigate to the option “Service searching” and press the OK-Button. The “Service searching” menu will open up. Navigate to the option “Tuner configuration” and press the OK-Button.
User Manual Dreambox DM 7025 english 11.1.1 Single satellite – direct connection (DVB-S) Use this type of configuration if you want to receive a single satellite with a Single Universal LNB. The coax cable is directly connected from you Dreambox to the LNB. Please read the section 11.1 DVB-S configuration to learn how to get into this menu. The “Satconfig” menu will open up. Use the up/down-Buttons to navigate to the “DiSEqC-Mode” option and use the left/rightButtons to select “Single”.
User Manual Dreambox DM 7025 english 11.1.2 Two satellites via Toneburst A/B (DVB-S) Use this type of configuration if you want to receive two satellites from one LNB each. It does not matter if you use one or two dishes to achieve this. Connect the two coax cables form the two LNBs to a so-called Toneburst switch and connect the coax cable from the Toneburst switch to your Dreambox. Please read the section 11.1 DVB-S configuration to learn how to get into this menu. The “Satconfig” menu will open up.
User Manual Dreambox DM 7025 english 11.1.3 Two satellites via DiSEqC A/B (DVB-S) Use this type of configuration if you want to receive two satellites from one Twin Universal or Quad Universal LNB. It does not matter if you use one or two dishes to achieve this. In this case the LNBs are connected to a so-called Multiswitch from which the signal is via coax cabled to the satellite receivers (Dreamboxes) in your household. Please read the section 11.1 DVB-S configuration to learn how to get into this menu.
User Manual Dreambox DM 7025 english 11.1.4 Four satellites via DiSEqC A/B/C/D (DVB-S) Use this type of configuration if you want to receive four satellites from one Single Universal or Twin Universal LNB for four or eight parties. It does not matter if you use one or two dishes to achieve this. In this case the LNBs are connected to a so-called Multiswitch from which the signal is via coax cabled to the satellite receivers (Dreamboxes) in your household. Please read the section 11.
User Manual Dreambox DM 7025 english 11.1.5 Stab Positioner using USALS (DVB-S) Use this type of configuration if you want to receive many satellites with a Stab positioner from a Single Universal LNB. The coax cable is directly connected from you Dreambox to the LNB. Please read the section 11.1 DVB-S configuration to learn how to get into this menu. The “Satconfig” menu will open up. Use the up/down-Buttons to navigate to the “DiSEqC-Mode” option and use the left/rightButtons to select “Positioner”.
User Manual Dreambox DM 7025 english 11.1.6 Tuner 2 setup (DVB-S) The same setup possibilities that applied for Tuner 1 also apply for Tuner 2. There are some additional configuration options. Equal to socket A: Use this setting if Tuner 2 should use the same settings as Tuner 1. Loopthrough to socket A: Use this option if you connected the LNB1 out to the LNB2 in. Nothing connected: Use this option if no cable is attached to Tuner 2.
User Manual Dreambox DM 7025 11.2 english DVB-C Tuner configuration Please read the section 11.1 DVB-S configuration to learn how to get into this menu. Use the Navigation-Buttons up and down to select the DVB-C Tuner and press the OK-Button. The default setting for this option is “ALL (SR6900)“. Use the Navigation-Buttons left/right to change this option to “ALL (SR6875)” if you cannot find any services during a service scan. Press the OK-Taste to activate your selection.
User Manual Dreambox DM 7025 11.3 english DVB-T Tuner configuration Please read the section 11.1 DVB-S configuration to learn how to get into this menu. Use the Navigation-Buttons up and down to select the DVB-T Tuner and press the OK-Button. Choose your region by pressing the NavigationButtons left/right. If you have connected an active antenna and you want to run the antenna without it’s original power supply set the “Enable 5V for active antenna” option to “On”.
User Manual Dreambox DM 7025 11.4 english Automatic scan If no OSD menu is visible on your screen, press the Menu-Button to open the main OSD menu. Navigate to the option “Setup” and press the OK-Button to select. Navigate to the option “Service searching” and press the OK-Button. The “Service searching” menu will open up. Navigate to the option “Automatic scan” and press the OK-Button. The “Automatic scan” menu will open up.
User Manual Dreambox DM 7025 english You can see the progress of the scan here. The scan is done once you see this menu. It shows how many channels were found during the scan. Press the OK-Button to close this menu.
User Manual Dreambox DM 7025 11.5 english Manual scan If no OSD menu is visible on your screen, press the Menu-Button to open the main OSD menu. Navigate to the option “Setup” and press the OK-Button to select. Navigate to the option “Service searching” and press the OK-Button. The “Service searching” menu will open up. Navigate to the option “Manual scan” and press the OK-Button. The “Service scan” menu will open up.
User Manual Dreambox DM 7025 12. Systeminformation 12.1 Service english If no OSD menu is visible on your screen, press the Menu-Button to open the main OSD menu. Navigate to the option “Information” and press the OK-Button to select. The “Information” menu will open up. Navigate to the option “Service” and press the OKButton. This window shows detailed technical information about the current service.
User Manual Dreambox DM 7025 12.2 english About (Hard- and Software) If no OSD menu is visible on your screen, press the Menu-Button to open the main OSD menu. Navigate to the option “Information” and press the OK-Button to select. The “Information” menu will open up. Navigate to the option “About…” and press the OKButton. This window shows all relevant information about the Hard- and Software of your Dreambox. Press the OK-Button to close this menu.
User Manual Dreambox DM 7025 13. english Troubleshooting Problem No audio, no video, LCD lit Possible cause Faulty wiring Check wiring and connections Faulty LNB Exchange LNB Wrong Tuner setting Review settings (see 11.1 DVB-S configuration) Dish aligned incorrectly Realign dish Beamlike blackouts in the video Heavy rain or snow Realign dish Dish is too small Install larger dish An obstacle between dish and satellite (e.g.
User Manual Dreambox DM 7025 14. english TV-Mode setup A four digit device code is selected from the device list and entered into the remote control. The most recent device list can be found on our website. SHIFT / SETUP-Button TV-Mode-Button Numeric-Keypad 14.1 Programming the remote control - Press the TV-Mode-Button once. - Press the SHIFT/Setup-Button for 3 seconds, the TV-Mode-Button will flash twice. - Use the Numeric-Keypad to enter the four digit device code into the remote control.
User Manual Dreambox DM 7025 14.2 english Device list A.R.
User Manual Dreambox DM 7025 Domland Drean DTS Dual Dumont Dux Dynatron Elbe Elcit Elekta Elin Elite Elman Elta Emerson Emperor Erres Etron Euro-Feel Europa Europhon Expert Exquisit Fenner Ferguson Fidelity Filsai Finlandia Finlux Firstline Fisher Flint FNR Formenti Fortress Fraba Friac Frontech Fujitsu Fujitsu General Funai Galaxi Galaxis GBC GE Geant Casino GEC Geloso General IInterfunk Internal Intervision Irradio Isukai ITC ITS ITT ITV 0424 0067 0039 0379 0247 0373 0289 0366 0549 0067 0382 0424 0429 0
User Manual Dreambox DM 7025 Jea JEC JVC Kaisui Kamp Kapsch Karcher KB Aristocrat Kendo Kennedy Kingsley Kneissel Kolster Konka Kontakt Korpel Korting Kosmos Kotron Kraking Kyoshu Kyoto Lemair Lenco Lenoir Lesa Leyco LG Liesenkotter Lifetec Lloyd’s Loewe Logik Logix Luma Lumatron Lux May Luxor Madison Magnadyne Magnafon Mandor Manesth Manhattan Marantz Marelli Mark Masuda Osume Otto Versand Pael Palladium Palsonic Panama Panasonic Panavision Pathe Cinema Pathe Marconi 066 065 0683 0083 0066 0401 0248 024
User Manual Dreambox DM 7025 Pausa Perdio Perfekt Pershin Philco Philharmonic Philips Phoenix Phonola Pioneer Pionier Plantron Playsonic Poppy Portland Prandoni-Prince Precision Prima Prinz Profex Proline Prosonic Protech Provision Pye Pymi Quadra Vision Quasar Quelle Questa R-Line Radialva Radiola Radiomarelli RadioShack Radiotone Rank RCA Recor Rediffusion Redstar Starlite Stenway Stern Strato Sunkai Sunstar Sunwood Superla Supertech Supra Susumu Sutron Swissline Sydney Sytong Tandberg Tandy Tashiko Tatu
User Manual Dreambox DM 7025 Tech Line Technema Technisat Tedelex Teleavia Telecor Telefunken Telefusion Telegazi Telemeister Telesonic Telestar Teletech Teleton Televideon Televiso Temco Tempest Tensai Tenson Tevion Texet Thomson Thorn Tokai Tokyo Tomashi Toshiba Towada Trans Continens Trident Tristar Triumph Uher Ultravox 0067 0698 0350 0685 0247 0139 0531 0317 0226 0429 0235 0363 0520 0067 0193 0248 0247 0289 0424 0139 0531 0528 0501 0429 0317 0104 0114 0131 0365 0292 0336 0373 0226 0067 0655 0067 0067
User Manual Dreambox DM 7025 15. Technical data - 300 MHz MIPS Processor - Linux open source (most parts under GPL) - DVB Common-Interface Slot - 2 x Smartcard-Reader - Integrated Compact Flash Reader (Slot inside the front panel) - 10/100 Mbit Ethernet Interface - USB 1.1 Port - Serial V.
User Manual Dreambox DM 7025 english Common-Interface: Common-Interface Power Consumption max. 0,3A/5V Video decoder: Video Compression MPEG-2 and MPEG-1 compatible Video Standard PAL G/ 25 Hz Video Formats 4:3 / 16:9 Footage 16:9, automatic assimilation for 16:9 TV-Device (over Scart) Letterbox percolating for 4:3 TV-Device Audio decoder: Audio compression MPEG-1 & MPEG-2 Layer I and II Audio Mode Dual (main/sub), Stereo Frequency: 32 kHz, 44.1 kHz, 48 kHz, 16 kHz, 22.
User Manual Dreambox DM 7025 USB: USB 1.1 connector UDMA66 IDE Interface: Internal HDD connector Compact Flash - Reader LNB power and polarization per tuner: LNB Current 500mA max. ; short-circuit-proof LNB Voltage vertical < 14V without load, > 11,5V at 400mA LNB Voltage horizontal < 20V without load, > 17,3V at 400mA LNB shut-off at Standby-Mode Count of active satellite position: DiSEqC 1.0/1.1/1.2 SAT POSITION / SAT OPTION DiSEqC - Rotor Control Power consumption: ca.
User Manual Dreambox DM 7025 16. Contact & support information Headquarter & Distribution: Dream-Multimedia Sales and distribution through Visoduck Discount GmbH Pierbusch 24-26 44536 Lünen Germany Dealer’s Hotline: (Dealers only) Tel.: +49 (0)180 - 368 43 98 - 000 Fax: +49 (0)180 - 368 43 98 - 001 (0,09€/min.) (0,09€/min.) You can reach the dealer’s hotline from : Mo - Fr. 09:00 am - 12:00 pm and 01:00 pm - 03:00 pm Technical Hotline: Tel.
User Manual Dreambox DM 7025 17. english Copyright notes © Dream-Multimedia 2006. All rights reserved. This product contains files that are distributed under different licenses, especially a Open Source License, the GNU General Public License. You can find details about this License on the next three pages. Additional notes about the source code and patches under The GPL license can be found on the internet under this link: http://www.dream-multimedia-tv.de/deutsch/downloads.
17.1 GNU GENERAL PUBLIC LICENSE Version 2, June 1991 Copyright (C) 1989, 1991 Free Software Foundation, Inc. 51 Franklin Street, Fifth Floor, Boston, MA 02110-1301, USA Everyone is permitted to copy and distribute verbatim copies of this license document, but changing it is not allowed. Preamble The licenses for most software are designed to take away your freedom to share and change it.
2. You may modify your copy or copies of the Program or any portion of it, thus forming a work based on the Program, and copy and distribute such modifications or work under the terms of Section 1 above, provided that you also meet all of these conditions: a) You must cause the modified files to carry prominent notices stating that you changed the files and the date of any change.
6. Each time you redistribute the Program (or any work based on the Program), the recipient automatically receives a license from the original licensor to copy, distribute or modify the Program subject to these terms and conditions. You may not impose any further restrictions on the recipients' exercise of the rights granted herein. You are not responsible for enforcing compliance by third parties to this License. 7.
18.