ATTENDANT USER GUIDE
NOTICE THIS DOCUMENT IS PROVIDED TO YOU FOR INFORMATIONAL PURPOSES ONLY. The information contained in this document is believed by Mitel Networks™ Corporation (MITEL®) to be accurate as of the date of its publication and is subject to change without notice. Mitel assumes no responsibility for any errors or omissions in this document and shall have no obligation to you as a result of having made this document available to you or as a result of the information it contains.
Table of Contents Getting Started . . . . . . . . . . . . . . . . . . . . . . . . . . . . . . . . . . . . . . . . . . . . . . . . . . . . . . . . . . . . . . . 1 Purpose of this Guide . . . . . . . . . . . . . . . . . . . . . . . . . . . . . . . . . . . . . . . . . . . . . . . . . . . . . . . . . 1 About Mitel Speech Server . . . . . . . . . . . . . . . . . . . . . . . . . . . . . . . . . . . . . . . . . . . . . . . . . . . . . 1 Benefits of the System . . . . . . . . . . . . . . . . . . . . . . . . . . . .
Speech Server Attendant User Guide 4
Getting Started Getting Started Purpose of this Guide This guide provides procedures for managing calls on the attendant-only Mitel® Speech Server system. Users with the unified messaging option should use the other guide, the Mitel Speech Server Attendant/Unified Messaging User Guide. About Mitel Speech Server Mitel Speech Server is a speech-enabled application that uses an automated attendant to route incoming calls based on spoken commands.
Document Title - Using Variables • Program your own directory list of frequently-called numbers in your Personal Directory, and then use voice commands to place calls to those numbers. • Call into the system from your home phone or cell phone and use voice commands to place calls to numbers that are programmed in your Personal Directory or Company Directory.
Getting Started • Users on an IP system not integrated with Active Directory, use http://3300IPaddress where 3300IPaddress is the IP address of the login page for the 3300 ICP Desktop Tool. The user names must be entered in the User Authorization Profile of the 3300 ICP System Administration tool.
Document Title - Using Variables 3. Say your 10-digit (for N.A. usage) or 11-digit (for U.K. usage) login ID so the system can verify your voice with the voiceprint registered during your enrollment. After the system verifies your voice, you have access to the system features and to your Personal Directory. Your system administrator programs manual login on lobby phones or department phones that serve many users. Changing Your Name Recording The system records your name during your enrollment.
Getting Started Your personal Profile Settings includes your Personal Directory and lets you • Program your phone numbers (cell phone, voice mail, home, fax, and pager) • Set your forwarding (reach me) options (destination and expiration time) • Set the prompt language (the language of the auto-attendant voice prompts on bilingual systems only) • Change your PIN Accessing your Personal Web Page To access your Personal Web Page 1. Open the browser window (Microsoft™ Internet Explorer 5.
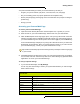
Document Title - Using Variables Personal Data Features Expert Voice Interface Displays "enabled" or "disabled." In expert voice interface mode, the Speech Server only provides a tone (instead of "Who would you like to call?") when you call into the system.. Mobility (Reach Me) Displays "enabled" or "disabled." Allows you to redirect your calls to your home, cell phone, pager, fax number, voice mail, or temporary number. Status Account Code Displays "enabled" or "disabled.
Getting Started Changing Your PIN To change your PIN 1. In your Personal Web Page, click Change PIN. 2. Enter your current PIN. 3. Enter your new PIN (4 to 7-digit number). 4. Enter your PIN again as a confirmation. 5. Click Change. 6. Click OK. The next time you want to log into your Personal Web Page you must enter your login ID and new PIN. Programming Your Numbers To program your cellular phone, home, fax, pager, and/or voice mail numbers 1. In your Personal Web Page, click Phone Numbers. 2.
Document Title - Using Variables Setting Your Forwarding Options You may want your calls forwarded to your voice mail if you don’t want to be interrupted, or you may want to have your calls forwarded to your cellular phone, or to a location (other than your office) that you frequently work in. Note: If your phone is on PBX other than the 3300 ICP, the calls that are redirected are only those that go through the Speech Server. People calling your phone number directly will not be rerouted.
Getting Started Defining Your Personal Directory Your Personal Directory is a list of names and telephone numbers for your personal use. The Personal Directory allows you to use voice commands to place calls to people not listed in the Company Directory. Note: The way you create personal contacts for your Personal Directory is dependent on the type of system that you have. Ask your administrator if your system is Active Directory enabled or not.
Document Title - Using Variables Tip: Use the demonstration mode to check if you can call your contact names. Say "Enable Demonstration Mode," say the contact name for a test, and then say "Disable Demonstration Mode" to return to normal operation. See Testing Contact Names, on page 13. Deleting Contact Names To delete a contact from your Personal Directory with your Personal Web Page 1. In your Personal Web Page, click Personal Directory. 2. Click the contact entry to select it. 3. Click Delete. 4.
Getting Started 4. For instructions on how to modify a contact, and for more instructions, refer to Help in Microsoft Outlook. Tip: To check if you can call your contacts, use the demo mode. Saying “Enable Demonstration mode” turns on the feature; “Disable the Demonstration mode” turns the feature off. Note: You can record the names of your contacts in your Personal Web Page so the system confirms the names with a human voice rather than with an automated one.
Document Title - Using Variables To enter a new contact in the Voice Contact category 1. In the Untitled Contact window, click Categories after adding the information for the new contact. 2. Select the check box for Voice Contact. 3. Click OK. Tip: You can quickly view which contacts belong to the Voice Contact category by clicking the View menu, selecting Current View, and then By Category. Microsoft Outlook will display your contact list, sorted by category.
Getting Started Testing Contact Names The system has a demonstration mode that allows you to try features, such as Call by Name, without actually placing the call. Instead of routing the call to the requested party, the system returns you to the main menu. To test your personal contact entries 1. Dial the Speech Server extension number. 2. Say “Enable Demonstration Mode.” 3. State the name, extension, or department (group) that you want to test. 4.
Document Title - Using Variables Using Speech Commands Speech Server responds to natural speech commands. When you become more comfortable with the prompts, you can use the Barge-in and the Expert Mode features. Barge-in Barge-in allows you to interrupt a system prompt with a request. Speech Server will stop playing the prompt and respond to your request. Barge-in allows experienced users to obtain faster service. Inexperienced users can still listen to the full prompts.
Using Speech Commands Universal Voice Commands The following voice commands are available from anywhere within the Speech Server system: Say...
Document Title - Using Variables - When you are in the sub-levels of the multi-level menu, you can press the * key on the phone to get back to the previous level. • If the number you are calling is not programmed, or is marked "Private," or marked for "Trusted Users" and you are not logged into the Speech Server system, the Attendant responds with "Sorry, that phone number is not available.
Using Speech Commands Note: If you specifically place a call to an extension number, for example, "John Smith at his office number" when call forwarding is set to their cellular phone, the system will honor your request and route the call to the extension number. 3. The system confirms the requested name. If the confirmation is correct, remain silent or say "Yes," and the Attendant will route your call.
Document Title - Using Variables You can enable, disable, or query the call forwarding with the Attendant. You can also program the call forwarding in the “Reach Me” section of your Personal Web Page. See page 8. For example, if Bill Jones is working from home, he can set "Reach Me" to his home phone number. Then, if someone calls him by requesting his name, the system automatically redirects the call to Bill’s home phone number.
Using Speech Commands To disable call forwarding 1. Dial the Speech Server extension number. Login if required. 2. Say "Call forwarding." The Attendant states your current call-forwarding settings. 3. Say "Disable call forwarding." To query your call forwarding setting 1. Dial the Speech Server extension number. Login if required. 2. Say "Call Forwarding." The Attendant states your current call-forwarding number and the expiration time.
Document Title - Using Variables Changing the Language On bilingual systems, you can switch or change the language of the auto-attendant prompts. After you state the desired language, the Attendant will provide prompts in that language for the duration of the call. Bilingual systems are available with the following languages: • English and French • English and Spanish To set the language of the auto-attendant prompts for the call 1. Dial the Speech Server extension number. 2.
Using Touchtone Commands Using Touchtone Commands You can place a call through the Speech Server system by dialing the number with touchtone (DTMF) dialing. To place a call with touchtone dialing 1. Dial the Speech Server extension number. 2. After the Attendant answers, dial the number. The Attendant places the call.
®,™ Trademark of Mitel Networks Corporation © Copyright 2005, Mitel Networks Corporation All rights reserved