
Installation Sheet

1.
Carefully unpack the fixture; lay out all parts on a clean surface.
Desembale cuidadosamente la lámpara y coloque todas las piezas sobre una superficie limpia.
2.
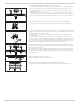
Place the canopy against the ceiling in the desired orientation andmark the locations of the
mounting keyhole slots. If necessary, drill holes for drywall anchors in the marked locations
and install the anchors.
Presente el plafón en su lugar de instalación con la orientación deseada y marque en el techo
los orificios ranurados del soporte. Si las condiciones del techo lo requieren, taladre los lugares
marcados con una broca adecuada para tacos de anclaje en falsos techos e inserte los tacos.
2
1120
3.
Connect the black supply wire to the black fixture wire using a wire connector. Connect the white
supply wire to the white fixture wire using a wire connector . Connect the fixture ground wire to the
supply ground wire using a wire connector.
The violet and grey need to connect to 0-10V dimmer. and the violet connect with DIM+, grey
connect to DIM-.
Conecte el cable de alimentación negro al cable negro de la lámpara por medio de una clema.
Conecte el cable de alimentación blanco al cable blanco de la lámpara por medio de una clema.
Conecte el cable de tierra de la lámpara al cable de tierra de la instalación eléctrica por medio de
una clema. Los cables violeta y gris están previstos para la conexión a un atenuador de 0 a 10V.
El cable violeta debe conectarse al contacto DIM (+), y el gris al contacto DIM (-).
4.
3
Fasten the mounting bracket onto the outlet box by using 2 outlet box screws provided.
Fije el soporte de montaje al cajetín de toma de corriente mediante los 2 tornillos incluidos.
4
Carefully tuck all wiring into the outlet box . Align the fixture pan over the outletbox , position the
mounting screws through the large openings of the key hole slots . Move the fixture pan to seat
the screws, and tighten securely.
Recoja cuidadosamente todo el cableado en el cajetín de toma de corriente. Presente el soporte
de la lámpara sobre el cajetín de toma de corriente haciendo coincidir los orificios de los taladros
con las ranuras grandes. Gire la carcasa de la lámpara hasta poder introducir los tornillos y apriete
estos firmemente.
5.
6. Slide the switch and select the color desired.
Deslice el interruptor y seleccione el color deseado.
Secure the fixture shade and the frame to the fixture pan using the thumb nuts.
Fije la pantalla y el marco de la lámpara al soporte mediante las tuercas de apriete manual.
7.
6
7
2700K
3000K
3500K
4000K
5000K
5