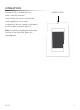
In-Wall Control Mount for iPod Touch
INTRODUCTION The Mirage KP-iOS is an in-wall system that allows iPod touch® (4th generation) to become a semi-permanent fixture in your wall. The system allows you to use an iPod touch as a key panel to control your Mirage Audio System via the Mirage App and wireless communication. Before installing and using the Mirage KP-iOS, please read and follow all of the instructions in this manual carefully.
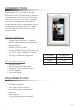
Selecting an Installation Location The KP-iOS is designed for use in normal interior environments. When selecting an installation location please consider the following: * Do not use the KP-iOS outside or in a humid or wet environment. It is not waterproof or water-resistant. * The KP-iOS cut-out must have enough depth within the wall cavity for the KP-iOS and its connections. * The KP-iOS has screw mounting holes on both sides that allow it to be installed up against a stud.
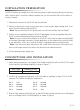
Installation Preparation The KP-iOS features an integral Roto-Lock mounting system for quick mounting directly into existing walls. Once the hole is cut and the cables have been run, you can install the iPort into the wall in a matter of seconds. 1. Determine the location for the KP-iOS and the wall plate. 2. Perform an obstruction survey to ensure there are no studs, conduit, pipes, heating ducts, or air returns that will interfere with the KP-iOS.
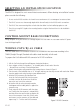
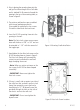
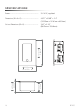
POWER WIRELESS INTERNET ETHERNET PORT 1 2 3 4 M-800 MIRAGE 8 ROOM DIGITAL AMPLIFIER Keypad Ports Figure 3: KP-iOS System Connection KP-iOS 5
4. Prior to placing the mounting frame into the wall, pull a sufficient length of the Cat5 cable and its attached RJ-45 connector through the opening in the top of the mounting frame, as shown in figure 4. 5. The retainer and bezel are pre-assembled with internal packaging materials. Disassemble by removing the four screws. Discard the foam block and card insert. 6. Insert the KP-iOS mounting frame into the opening in the wall.
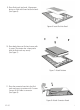
9. Place iPod touch into bezel. Align power button on iPod with Power Button on bezel. (See Figure 6) Figure 6: Insert iPod into Bezel 10. Place back plate over iPod and secure with 4 screws. The retainer has a foam pad to hold the iPod touch very securly. (See Figure 7) Figure 7: Attach Retainer 11. Place the connector board into the iPod touch and secure to retainer with 2 screws. Connect RJ-45 Cable to connector. (See Figure 8).
12. Attach the assembly to the mounting frame as shown in Figure 9. Note: To sync your iPod touch with your computer, please follow the steps above in reverse order to remove the iPod touch and sync. Once your synchronization is complete, reinstall the iPod touch and follow the steps to reassemble.
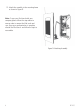
Operation Once the KP-iOS is installed, the iPod touch is now fully functional. POWER BUTTON Use the iPod touch screen to choose: home screen, applications, music, email. A power on/off button is located on the edge of the KP-iOS bezel as noted in figure 10. Note: For questions regarding the touchscreen functions of your iPod touch, please visit: www.apple.
Specifications 5V 1A DC, regulated Dimensions (W x H x D)....................................... 4 .027” x 5.969” x 2.4” (102.29mm x 151.61mm x 60.9mm) Cut-out Dimensions (W x H)................................ 3.42” x 5 .34” (86.87mm x 135.64mm) 151.61mm 5.969in Power.................................................................. 10 55.62mm 2.190in 60.96mm 2.400in 102.29mm 4.
LIMITED ONE (1) YEAR WARRANTY AUTONOMIC warrants to the first end-user purchaser that this AUTONOMIC-Brand product (“Product”), when purchased from and installed by an authorized AUTONOMIC Dealer/Distributor, will be free from defective workmanship and materials in the initial installation for the period stated below.
914 598 1647 | www.Autonomic-Controls.com ©2012 Autonomic Controls and Dana Innovations. All rights reserved. Autonomic, iPort, and Roto-Lock are registered trademarks of Autonomic and Dana Innovations. iPod is a trademark of Apple Inc. “Made for iPod” means that an electronic accessory has been designed to connect specifically to iPod and has been certified by the developer to meet Apple performance standards.