
User manual


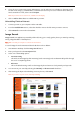


Table Of Contents
- Getting to know your Mio
- Using your Mio in a vehicle
- Operating basics
- Mio Connect (select models only)
- Bluetooth connectivity (Moov 330/360 only)
- Using Bluetooth Hands-Free Calling (Moov 360 only)
- MioMore Desktop
- Reference
- Regulatory information

6. The matching photos will appear in the display area. The bottom of the screen provides a Back and a Next
button for going to the previous and next page.
7. From the display area select a picture or group of pictures you want to import to your Photo Album.
8. Right click and select Import to Photo Album. A new album is created in the Desktop album section of
Photo Album.
Photo Album
Photo Album allows you to copy, delete, or move pictures or albums between the NavPix library on your Mio
and on your computer.
Note: Before you begin, ensure your Mio is connected to your computer via the USB cable.
n
o
p
q
s
r
Element Description
n
NavPix menu
Gives access to Photo Album functionality.
o
Desktop albums
Displays a list of all albums stored in the NavPix library on your computer. Click an album to
display its contents in the Album display area. Click the View all NavPix button to display all
pictures stored in the NavPix library on your computer.
p
My Mio albums
Displays a list of albums stored on the Mio internal memory and on the memory card if one is
inserted. Click an album to display its contents in the Album display area.
q
Album display
area
Displays thumbnails of pictures in the selected album.
r
Search
Type to search for a picture by name.
s
Toolbar
When a picture is selected, the icons which can be used will be active.
26